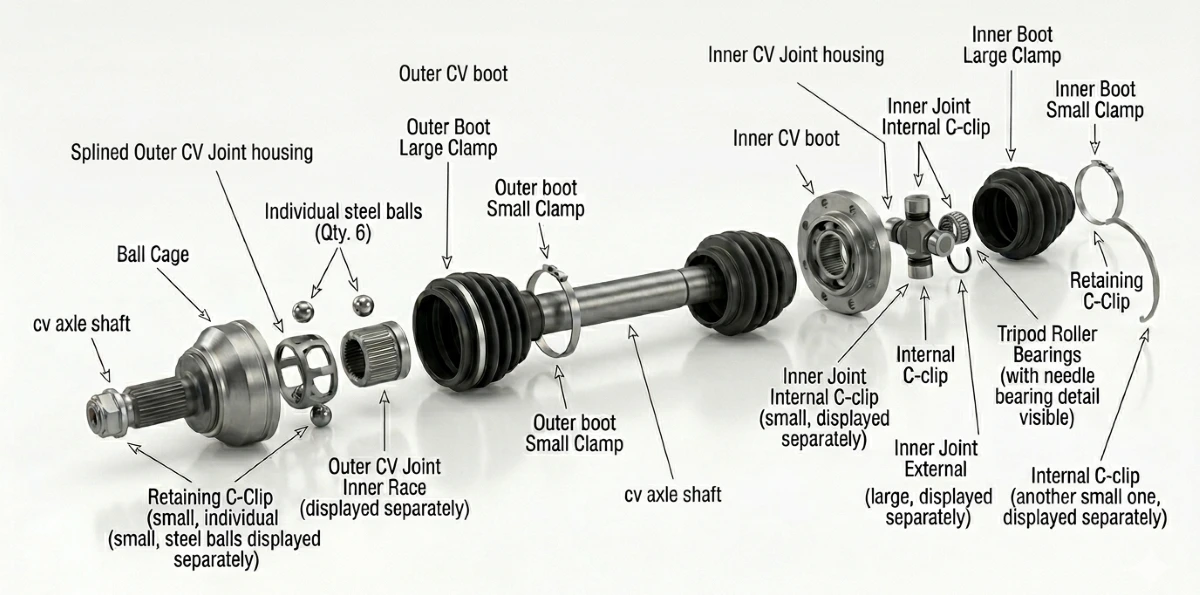
If your vehicle clicks when turning, vibrates under acceleration, shows grease on the inside of a tire, knocks over bumps, or feels sluggish, you likely have a bad CV axle. These five symptoms are the most common indicators of CV axle failure, and any one of them warrants immediate inspection. Driving with a failing CV axle risks catastrophic failure—the axle can snap, causing loss of control and expensive damage. Use this decision framework: identify the failure mode, determine the root cause, then compare repair vs. replacement costs. Not all symptoms are obvious; some require systematic diagnosis to avoid misdiagnosis.
Detailed Symptom Breakdown: What Each Sign Indicates and How to Confirm It
Clicking Noise When Turning
A clicking or popping noise that intensifies during tight turns—especially when accelerating through a turn—is the classic sign of a worn outer CV joint. The outer joint operates at a steep angle during turns, and when its bearings or races wear, they produce a rhythmic click. To confirm: find an empty parking lot, turn the steering wheel to full lock, and drive in slow circles in both directions. If you hear a distinct clicking, the outer joint is likely failing. This noise often indicates that the joint has lost lubrication due to a torn boot, allowing dirt and water to contaminate the grease.
Vibration During Acceleration
A vibration that occurs under hard acceleration, particularly when the steering wheel is straight, points to a worn inner CV joint or an imbalanced axle shaft. The inner joint handles power delivery from the transmission, and when it wears, it can cause a shuddering sensation. To test: from a stop, accelerate briskly in a straight line. If the vibration is present only during acceleration and disappears when you coast, the inner joint is suspect. However, don't jump to conclusions—vibration can also stem from wheel balance, tire issues, or engine mounts. Rule those out first.
Grease Leak on the Inside of the Tire
If you see black or dark gray grease splattered on the inside of a tire, wheel well, or suspension component, a CV boot has torn. The boot is a rubber protective cover that keeps grease in and contaminants out. When it tears, centrifugal force flings grease outward, leaving a telltale trail. Inspect the boot for cracks, splits, or punctures—often near the clamp areas. A torn boot leads to rapid joint wear because grease escapes and dirt enters. Even if you don't hear noise yet, a torn boot requires immediate attention to prevent joint damage.
Knocking Sound When Driving Over Bumps
A knocking or clunking noise when driving over speed bumps, potholes, or uneven surfaces can indicate a worn CV joint or a loose axle shaft. The joint may have excessive play, causing metal-on-metal contact. To test: drive slowly over a series of speed bumps, listening for a dull knock. But beware—this symptom can also be caused by worn sway bar links, tie rod ends, or ball joints. A thorough inspection is necessary to isolate the source.
Loss of Power or Sluggish Acceleration
A less common but possible symptom is a noticeable loss of power or sluggish acceleration. A failing CV axle can bind or slip, especially under load, reducing power delivery to the wheels. To test: accelerate hard from a stop and feel for hesitation or a lack of response. If other symptoms (clicking, vibration) are absent, this could also indicate transmission issues, so a proper diagnosis is critical.
Step-by-Step Diagnosis: How to Isolate a Faulty CV Axle
Follow this systematic procedure to confirm a CV axle issue and rule out other components.
Visual Inspection of Boots
Park the vehicle on a level surface, turn off the engine, and inspect each CV boot (there are typically four on a front-wheel-drive car—two per side). Look for tears, cracks, or splits in the rubber, and check for grease residue around the boot or on nearby components. Use a flashlight to see the inner side of the boot. If you find any damage, the axle is compromised.
The Parking Lot Test
Find a large, empty parking lot. With the vehicle in drive, turn the steering wheel to full lock and drive in slow circles—first in one direction, then the other. Listen for clicking or popping sounds. Note whether the noise occurs on both sides or only one, and whether it's constant or intermittent. This test specifically stresses the outer joints.
Lifting the Vehicle and Checking for Play
Raise the vehicle securely on jack stands. Grasp the CV axle shaft near the joint and attempt to move it up, down, and side to side. Excessive play (more than a few millimeters) indicates a worn joint. Also check for any visible damage to the shaft, such as dents or rust. While under the vehicle, inspect the boots again from a different angle.
Road Test
Take the vehicle for a road test on a variety of surfaces. Accelerate hard from a stop, decelerate, and drive over speed bumps. Reproduce the symptoms you've noticed and note the exact conditions (speed, steering angle, road surface). This helps confirm the diagnosis and may reveal other issues.
Rule Out Other Causes
If symptoms persist after checking the CV axles, consider other components: wheel bearings (often growl or hum), tie rods (clunk over bumps), and suspension bushings. A misdiagnosis can lead to unnecessary axle replacement, so be thorough.
Root Causes of CV Axle Failure: Why It Happens and How to Prevent It
Torn Boots and Grease Loss
The most common cause of CV axle failure is a torn boot. Once the boot tears, grease leaks out, and water, dirt, and road salt enter the joint. This contamination accelerates wear, leading to noise and eventual failure. Regularly inspect boots during oil changes or tire rotations—catching a tear early can save you from replacing the entire axle.
Normal Wear and Tear
CV axles are wear items. Over time, the constant flexing and rotation of the joints cause natural wear. High mileage (typically over 100,000 miles) and age contribute to degradation. Driving conditions play a significant role: frequent sharp turns, aggressive driving, and off-road use stress the joints more.
Driving Conditions and Overloading
Exposure to road salt and debris can corrode the axle shaft and damage the boot. Overloading the vehicle beyond its rated capacity puts extra stress on the axles, accelerating wear. If you regularly carry heavy loads or tow, expect shorter CV axle life.
Preventive Maintenance
- Inspect CV boots at every oil change.
- Replace a torn boot immediately—even if the joint is still good.
- Avoid harsh driving conditions when possible.
- Don't overload your vehicle.
- If you notice any symptoms, diagnose early to prevent further damage.
Replacement Decision: OEM vs. Aftermarket and Cost Factors
OEM vs Aftermarket: What's the Difference?
OEM (Original Equipment Manufacturer) axles are made to the exact specifications of your vehicle's original parts. They typically offer the best fit and quality control but come at a higher price—often $150 to $300 per axle. Aftermarket axles vary widely in quality. Some are remanufactured (rebuilt) units, while others are new from reputable brands. Quality aftermarket axles can cost $50 to $150 and may be perfectly reliable. However, cheap no-name brands may use inferior materials or poor manufacturing, leading to premature failure.
Cost Factors
- Parts cost: $50 to $300+ per axle, depending on brand and quality.
- Labor cost: Typically $100 to $200 per axle at a shop; DIY saves this but requires tools and time.
- Additional costs: Alignment may be needed if suspension components were disturbed; other parts like axle nuts or circlips may be required.
Warranty Considerations
OEM axles often come with a longer warranty (e.g., 2 years or more), while aftermarket warranties vary—some offer lifetime warranties, others only 1 year. Read the fine print.
Recommendation
For most vehicles, a quality aftermarket axle from a reputable brand is a cost-effective choice. However, if your vehicle is still under factory warranty, or if you demand absolute reliability (e.g., for a daily driver in remote areas), OEM may be worth the extra cost. Always check reviews and choose a brand with a solid reputation.
When to Repair vs. Replace: Making the Right Call
Repair Options
If you catch a torn boot early—before the joint is damaged—you can replace just the boot. Boot kits cost $15 to $30, but labor can be high ($100 to $200) because the axle must be removed and disassembled. In many cases, it's more cost-effective to replace the entire axle, especially if the joint shows any wear.
Replace When
- The joint is worn (clicking or play).
- The shaft is damaged (bent, rusted, or dented).
- The boot has been torn for a long time, allowing contamination.
- The axle is high mileage and you want peace of mind.
Cost-Benefit Analysis
Compare the total cost of repair (parts + labor) vs. replacement. If repair costs more than 50% of a new axle, replace. For example, if a new axle costs $150 and labor is $150, replacement totals $300. A boot repair might be $200, but if the joint is already worn, you'll soon need a new axle anyway—so replacement is smarter.
Safety Considerations
A failed CV axle can cause sudden loss of power or even a wheel to lock up, leading to a serious accident. If there's any doubt about the integrity of the axle, replace it. Safety should always be the priority.
Common Mistakes in CV Axle Diagnosis and How to Avoid Them
Mistake 1: Assuming Any Clicking Noise Is a CV Axle
Other components—like wheel bearings, tie rods, or even a loose heat shield—can produce clicking sounds. Always perform the parking lot test and inspect the boots before condemning the axle.
Mistake 2: Ignoring Vibration Symptoms
Vibration during acceleration is often attributed to wheel balance or tires. While those are possible, a worn inner CV joint can also cause it. Don't overlook the axle; include it in your diagnostic checklist.
Mistake 3: Not Inspecting the Boot Thoroughly
A small tear can be hidden on the inner side of the boot. Use a flashlight and feel along the entire boot for cracks or grease. A missed tear leads to premature joint failure.
Mistake 4: Replacing the Axle Without Checking for Underlying Issues
If a CV axle failed prematurely, there may be an underlying cause—like a damaged suspension component or excessive engine movement. Replacing the axle without addressing the root cause will lead to another failure. Inspect engine mounts, control arms, and bushings.
How to Avoid These Mistakes
Follow a systematic diagnostic process: visual inspection, parking lot test, lift and check for play, road test, and rule out other components. This reduces the risk of misdiagnosis and unnecessary repairs.
Preventive Maintenance and Final Recommendations
To extend the life of your CV axles:
- Inspect boots regularly—at least every oil change.
- Replace torn boots immediately.
- Avoid harsh driving conditions and overloading.
- If symptoms appear, diagnose systematically and replace with quality parts.
Final recommendation: prioritize safety. A bad CV axle is not something to ignore. Use the diagnostic steps in this guide to confirm the issue, then make an informed decision based on cost and quality. When in doubt, consult a professional mechanic—but now you'll know exactly what to ask.
For high-quality replacement parts, consider our [automotive suspension components](/products), manufactured with precision in [our manufacturing facility](/manufacturing) and backed by rigorous [quality control](/quality). Learn more [about our company](/about).