Bump Steer Is a Toe-Change Curve, Not a Yes/No Defect
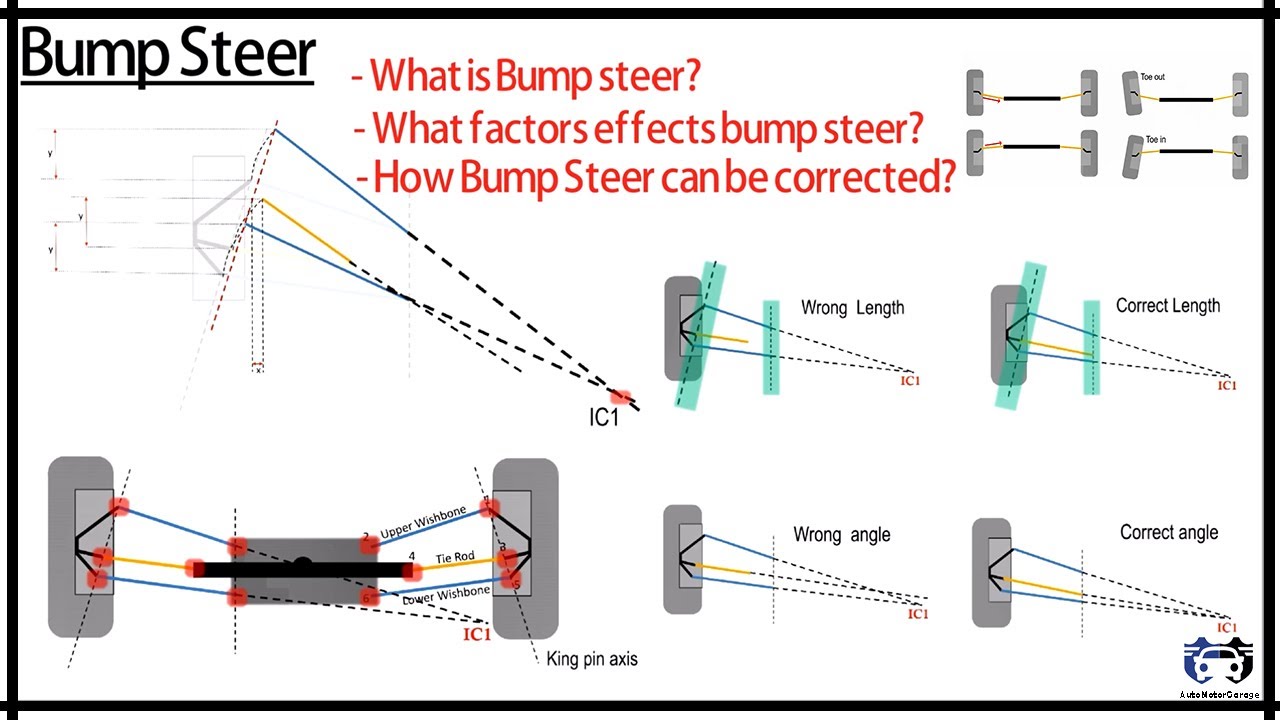
Bump steer is the change in toe angle as the suspension moves through bump and droop. It is a rate — degrees or inches of toe change per inch of vertical travel — not a single static number you can look up or feel once. Every independent suspension has some bump steer by geometry. The question is never "does my car have it" but "does my car's toe-change curve stay inside a tolerance band for how I actually drive."
Lowering does not automatically create bump steer. It changes the operating range of the existing curve. A curve that was acceptable at stock ride height can become unacceptable at the new height because you are now using a different, steeper part of the same curve. If you assume lowering caused a new defect, you will buy parts to fix a curve you never measured.
The symptom set — darting under braking, wandering on crowned roads, instability over expansion joints, vague on-center feel — is shared with caster, camber, static toe, tire construction, and worn bushings. Symptom alone cannot confirm bump steer. A worn control-arm bushing or a collapsed trailing-arm bushing can produce the same steering instability by allowing the arm to move under load. Measurement comes before diagnosis, and diagnosis comes before purchase.
How to Measure and Plot a Bump Steer Curve With Basic Tools
The standard method uses a dial indicator or bump steer gauge referenced to the wheel or hub while the suspension is cycled through a known travel range. The indicator is fixtured to the chassis, its contact point rests against the wheel rim or brake rotor face, and you record toe change at discrete travel points — typically every 0.5 in or 12 mm — from full droop to full bump.
A low-cost method works for anyone with basic tools. Fix a straightedge or laser level to the hub face, set a plumb line or reference mark on the floor ahead of the tire, and use a tape measure to record the lateral movement of the beam or edge at each travel point. The output is the same: a table of travel versus toe change.
Plot that table as a curve. The slope at any point is the local bump steer rate. The total spread across the travel range is the headline number. Two rules prevent misreading: zero the measurement at ride height with the suspension loaded, and keep the steering centered. If you zero at full droop or with the wheel turned, the entire curve is offset and your interpretation will be wrong.
Reading the Curve: Total Toe Change, Shape, and Acceptable Limits by Use Case
Total toe change across the travel range is the primary number. Curve shape determines how the car feels. A linear curve produces predictable, proportional steering input as the suspension moves. A progressive curve — where the rate increases sharply near the end of travel — produces a car that feels stable in small bumps but darts when the suspension compresses hard. A sign-changing curve, where toe goes from in to out or vice versa through travel, is the most objectionable because the axle's slip-angle behavior reverses mid-corner.
Acceptable limits should be expressed as a range tied to use case and tire type, not a single universal number. Street cars generally tolerate more total toe change than track cars because the driver is not at the limit of grip and steering corrections are slower. Off-road use tolerates more again because surface inputs dominate and the driver is constantly making large corrections. A same-sign curve of moderate magnitude is far less problematic than a smaller sign-changing curve.
Compare your measured spread to the band for your use case. If the curve stays inside the band and the symptom is present, the symptom is coming from somewhere else — caster, camber, static toe, tire pressure, or a worn bushing. If the curve exceeds the band, you have a measured problem worth correcting.
Why Caster and Tie-Rod Inner Pivot Height Move the Curve
Caster changes rotate the steering axis and move the tie rod's effective inner pivot relative to the rack or steering box. This shifts the bump steer curve rather than scaling it uniformly. A caster change made for handling reasons — adding positive caster for straight-line stability — can create a bump steer problem that did not exist before, because the tie rod now sits at a different angle relative to the control arm.
Tie-rod inner pivot height relative to the lower control arm inner pivot and the rack position sets the curve's slope. Raising or lowering the inner tie-rod end is the primary geometric correction. When the tie rod's arc matches the control arm's arc more closely, toe change through travel is minimized.
Because caster and tie-rod height both move the curve, they interact. If you change caster and then measure bump steer, you are measuring the combined effect. This is why the correction sequence matters: establish your caster setting first, then measure bump steer, then correct tie-rod height. Otherwise you will chase a moving target.
Bump Steer Behavior by Suspension Type: Strut, Double Wishbone, Solid Axle
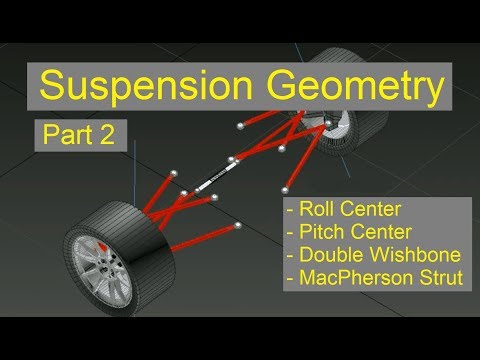
MacPherson strut: the tie rod and strut share a similar pivot region, so bump steer is sensitive to ride height and caster. Correction usually means tie-rod height adjustment or a bump steer kit at the outer tie rod. Lowering a strut car moves the tie rod into a different part of its arc, which is why strut cars are often the most sensitive to ride-height changes.
Double wishbone: the tie rod's inner pivot can be positioned independently of the control arm pivots, so bump steer is more tunable. Correction often involves shimming or relocating the inner tie-rod pivot. This architecture gives you more correction options but also more ways to get the geometry wrong if you change one pivot without considering the others.
Solid axle: bump steer is dominated by steering linkage geometry — drag link and track bar — rather than independent suspension pivots. Correction focuses on linkage angle and length. A lifted solid-axle vehicle with a dropped pitman arm and a track bar that is not parallel to the drag link will have bump steer that no amount of tie-rod adjustment can fix.
The applicable correction path is set by the architecture. Identifying your suspension type first prevents buying a kit that does not address the actual curve.
Correction Paths in Order of Cost and Reversibility
Step 1: tie-rod height and angle adjustment. Shims, spacers, or flipping the outer tie-rod end. Lowest cost, fully reversible, addresses the curve directly. This is where you start. If the curve is only slightly out of band, this step alone often brings it back.
Step 2: bump steer correction kit. A relocated inner or outer tie-rod pivot, or a bump steer kit with an adjustable stud. Moderate cost, reversible, addresses curves that height adjustment alone cannot. These kits change the tie rod's effective pivot point to better match the control arm arc.
Step 3: geometry changes. Control-arm pivot relocation, rack relocation, custom crossmember. Highest cost, least reversible, reserved for curves that cannot be corrected by tie-rod geometry. This is the last resort, not the first purchase.
Each step should be followed by re-measurement. The curve is the only feedback that confirms the correction worked. If you skip re-measurement, you are guessing.
When Correction Is Necessary vs. Overkill, and the Trade-Offs It Introduces
Correction is necessary when the measured curve exceeds the tolerance band for your use case and the symptom is present at that use case. It is overkill when the curve is within band and the symptom is caused by something else. A street car with a mild same-sign curve and no driver complaint does not need a bump steer kit. A track car with a sign-changing curve and mid-corner instability does.
Trade-offs of correction include reduced suspension travel if geometry is changed, potential interference with other components, added cost, and the risk of introducing a new curve problem if the correction is not re-measured. Some bump steer is normal and harmless on a street car. Measure, judge against use case, and correct only what is out of tolerance.
Re-measure after any correction and compare the new curve to the same tolerance band used in the judgment step. If the curve is now inside the band and the symptom is gone, you are done. If the curve is inside the band but the symptom persists, the problem was never bump steer.
FAQ
Can I fix bump steer without a bump steer kit?
Yes, if the curve is only slightly out of band. Tie-rod height adjustment via shims or spacers is the first step and often sufficient. Measure before and after to confirm.
Does lowering always cause bump steer?
No. Lowering changes the operating range of the existing curve. The curve may have been acceptable at stock height and unacceptable at the new height, but the geometry was always there.
How much bump steer is acceptable?
It depends on use case. Street cars tolerate more than track cars. Off-road tolerates more again. Express the limit as a range tied to your use case and tire type, not a universal number.
What is the best way to fix bump steer?
Start with the cheapest, most reversible correction: tie-rod height and angle adjustment. Re-measure. If the curve is still out of band, move to a bump steer correction kit. Geometry changes are the last resort.
Can worn bushings cause bump steer symptoms?
Yes. A worn control-arm bushing or trailing-arm bushing can allow the arm to move under load, producing steering instability that mimics bump steer. Inspect bushings before buying correction parts.
---
Related