Torsion Bar Suspension: Symptoms, Diagnosis and Replacement Guide
A sagging front corner, a clunk over bumps, or an alignment that won't hold is more often a ball joint, control arm bushing, or shock problem than a fatigued torsion bar. Torsion bars are tuned springs, and like any spring they can lose tension — but the components around them fail far more frequently and produce overlapping symptoms that send owners toward the wrong part.
The diagnostic trap is symptom overlap. A sagging corner can come from bar tension loss, a collapsed control arm bushing, or a broken helper spring. A clunk over bumps can come from a ball joint, a sway bar link, or a shock mount. Poor alignment retention can come from a side-to-side bar height mismatch, worn tie rod ends, or control arm bushings. Bottoming out over dips is usually a shock damping failure or a ride height that has dropped below the bump stop threshold.
Replacing a torsion bar that isn't the root cause leaves the real fault in place and doubles the labor bill, because the front end has to come apart twice. The rule-out sequence in this guide — ball joints, then bushings, then shocks, then the bar — is the decision framework you should apply before ordering any part.
Symptom-to-Cause Mapping: Which Complaints Actually Point to Torsion Bar Fatigue
Classify the symptom before touching a wrench. Each complaint below maps to at least two possible causes, and only one of them is the bar.
| Symptom | Possible causes | Torsion-bar-specific test |
|---|---|---|
| Sagging ride height | Bar tension loss; collapsed control arm bushing; broken helper spring | Measure ride height at spec'd frame points; adjuster near full travel and still below spec = bar |
| Clunking over bumps | Ball joints; sway bar links; shock mounts; loose bar anchor/adjuster | Check anchor and adjuster bolt first — the only bar-related clunk sources |
| Poor alignment retention | Bar height mismatch side-to-side; worn tie rod ends; control arm bushings | Compare adjuster bolts and ride height side-to-side |
| Bottoming out over dips | Shock damping failure; ride height below bump stop threshold | Bounce test — more than 1–2 rebounds = shock, not bar |
Sagging ride height on one or both sides. Can indicate torsion bar tension loss, but also a collapsed control arm bushing or a broken leaf/coil helper. Verify by measuring ride height at the specified frame points before and after adjustment. If the adjuster bolt is already near full travel and the corner still won't come up to spec, the bar is a stronger suspect.
Clunking over bumps. More often ball joints, sway bar links, or shock mounts than the torsion bar itself. A bar under load doesn't typically produce a loose-metal clunk unless its anchor or adjuster bolt has backed off. Check those two fasteners first — they are the only bar-related clunk sources.
Poor alignment retention (vehicle pulls or drifts after alignment). Can be caused by torsion bar height mismatch side-to-side, but also by worn tie rod ends or control arm bushings. Check the bar's adjuster bolts and anchor points first; if both sides measure equal and the pull persists, the alignment shop is chasing a steering or bushing fault, not the bar.
Bottoming out over dips. Usually a shock damping failure or a ride height that has dropped below the bump stop threshold, not a bar that has 'gone soft' in isolation. A blown shock lets the suspension compress further than the bar alone would allow.
The Rule-Out Diagnostic Sequence: Ball Joints, Bushings, and Shocks Before the Bar
Work the sequence in order and document ride height at each corner before and after each step. If the symptom changes when a non-bar component is corrected, the bar was never the problem.
Step 1 — Ball joints
Raise the front end, load the lower control arm, and check for vertical and lateral play at the ball joint stud. Any play beyond spec condemns the joint, not the bar. Ball joint wear is the single most common misdiagnosis on torsion bar trucks because the resulting camber change mimics a sagging corner.
Step 2 — Control arm bushings
Inspect for cracking, separation, or excessive deflection under load. A collapsed bushing changes ride height and alignment geometry in ways that mimic torsion bar fatigue. Look at the bushing under load, not just hanging free — deflection only shows when the suspension is compressed.
Step 3 — Shocks
Check for fluid leakage, worn bushings, and loss of damping by bouncing the corner and counting rebound cycles. A blown shock causes bottoming and poor ride that readers often blame on the bar. If the corner bounces more than once or twice after release, the shock is done.
Step 4 — Torsion bar and adjuster
Only after the first three pass, inspect the bar for visible cracks, corrosion pitting, damaged splines, and check that the adjuster bolt and anchor are intact and correctly indexed. Measure ride height at the specified frame points on both sides. A persistent side-to-side mismatch that won't adjust out points to the bar or its anchor.
Do Torsion Bars Really 'Never Wear Out'? What Actually Happens Over 300k Miles
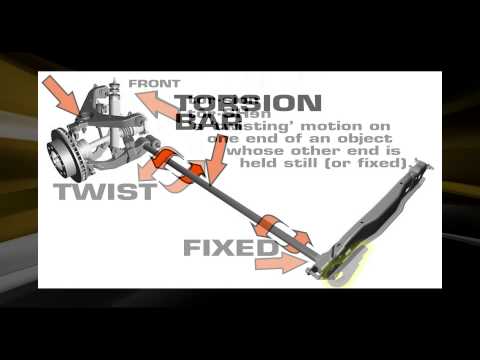
The forum claim that torsion bars are lifetime parts is wrong, but the failure mode isn't a sudden snap. Torsion bars are springs — like any spring, they can experience fatigue and lose load capacity over extended cycles, especially when overloaded or corroded.
The more common real-world failure modes are corrosion pitting (which creates stress risers), damaged splines from improper indexing, and seized or broken adjuster bolts. A bar that has lost tension will typically show a ride height that cannot be brought back to spec even with the adjuster at full travel, or a side-to-side height mismatch that persists after adjustment.
High-mileage vehicles (300k+) are more likely to have worn bushings, ball joints, and shocks than a fatigued bar, but the bar should not be assumed innocent without inspection. The practical test is simple: if the adjuster has travel left and the corner still won't reach spec, the bar is suspect. If the adjuster is maxed out, the bar is the problem.
Replacement Procedure: Tools, Stored Energy Safety, and Ride Height Adjustment
A loaded torsion bar holds significant stored energy. Never remove the adjuster bolt or anchor without first unloading the bar using the specified tool or procedure. This is the single most important safety point in the job — a released bar can cause serious injury.
Tools typically required: torsion bar unloading tool (or equivalent), jack stands, torque wrench, ride height gauge, and penetrating oil for corroded adjusters.
Replacement steps: unload the bar, disconnect the adjuster and anchor, slide the bar out (may require control arm separation), install the new bar with correct indexing, and set initial ride height per the vehicle's specification.
Ride height adjustment: turn the adjuster bolt to raise or lower the corner, then bounce the suspension and re-measure. Height changes affect alignment, so this must be done before the alignment.
Re-indexing: if the bar has splines on both ends, it must be indexed correctly to the control arm and anchor or the adjuster will run out of travel before reaching spec. This is the step most DIY installs get wrong, and it's the reason a new bar can appear 'defective' when it's simply indexed one spline off.
Post-Replacement Alignment and Re-Indexing: What Must Happen Before the Vehicle Is Driven
Any change in torsion bar ride height changes camber, caster, and toe — an alignment is mandatory after replacement or adjustment. Skipping it causes premature tire wear and handling complaints that owners then attribute to the new bar.
Re-indexing the bar on its splines may be necessary if the adjuster cannot achieve the target ride height within its normal travel range. Alignment specs should be set to the vehicle manufacturer's recommended values, not 'whatever the shop had last time' — torsion bar height is the baseline for those specs.
Driving without an alignment after bar replacement can scrub new tires in a few hundred miles and mask a ride height problem that will return. Budget the alignment as part of the job, not an optional add-on.
Cost Breakdown: Part Price by Vehicle Class, Labor Hours, and the Alignment Add-On
Part cost varies by vehicle class: compact/midsize trucks and SUVs typically have more aftermarket torsion bar options and lower prices than heavy-duty or older specialty applications. Labor hours depend on access: some vehicles require control arm separation or exhaust/underbody component removal, which can double the book time.
Alignment is a separate line item and should be budgeted as a mandatory add-on, not an optional extra. Additional costs may include new adjuster bolts, anchors, or bushings if they are corroded or damaged during removal — these are often not included in the bar price.
When sourcing replacement bars, confirm fitment by vehicle platform and check that the bar's spline count and indexing match the original. For related front-end components, our automotive suspension components catalog covers control arms and bushings that are commonly replaced alongside torsion bars.
Maintenance and Inspection Tips to Prevent Premature Torsion Bar Wear
Inspect torsion bar adjuster bolts and anchors at every oil change or at least annually — corrosion and loosening are the leading causes of bar-related ride height problems. Keep the bar clean and free of heavy corrosion; pitting creates stress risers that can lead to cracking over time.
Check ride height at each corner periodically and compare to spec — a slow drop is the earliest sign of tension loss or a failing adjuster. Address ball joint, bushing, and shock wear promptly; a worn shock or collapsed bushing puts extra load on the torsion bar and accelerates fatigue.
If you are sourcing suspension components for a torsion bar platform, our quality control process and manufacturing facility overview explain how we verify fitment and material consistency. For wholesale or import inquiries, about our company covers our supply capabilities.
FAQ
How do I know if my torsion bar is bad or if it's something else?
Start with the rule-out sequence: ball joints, control arm bushings, then shocks. If those pass and the adjuster bolt is near or at full travel with the corner still below spec, the bar is the problem. A persistent side-to-side height mismatch that won't adjust out also points to the bar or its anchor.
Can a torsion bar cause a clunk over bumps?
Rarely. A bar under load doesn't typically produce a loose-metal clunk unless its anchor or adjuster bolt has backed off. Check those two fasteners first — they are the only bar-related clunk sources. Otherwise, look at ball joints, sway bar links, and shock mounts.
Do torsion bars wear out?
Yes, but not by snapping. They fatigue and lose load capacity over extended cycles, especially when overloaded or corroded. Corrosion pitting, damaged splines from improper indexing, and seized or broken adjuster bolts are the more common real-world failure modes.
Why does my new torsion bar seem defective?
It's usually indexed one spline off. If the bar has splines on both ends, it must be indexed correctly to the control arm and anchor or the adjuster will run out of travel before reaching spec. Re-index before condemning the part.
Is an alignment required after torsion bar replacement?
Yes. Any change in ride height changes camber, caster, and toe. Skipping the alignment causes premature tire wear and handling complaints that owners then attribute to the new bar. Set specs to the vehicle manufacturer's recommended values.