Anti-Dive vs. Anti-Squat: How to Measure, Calculate, and Tune the Right Percentage for Your Vehicle

Anti-dive and anti-squat are tuning windows, not targets. The right percentage for your car depends on its wheelbase, center of gravity height, tire grip, and how you drive it. You find that window by measuring link angles, locating the instant center, calculating the percentage, and then testing and verifying the change. Copying a number from a forum will not work because the same percentage on a different car produces completely different handling.
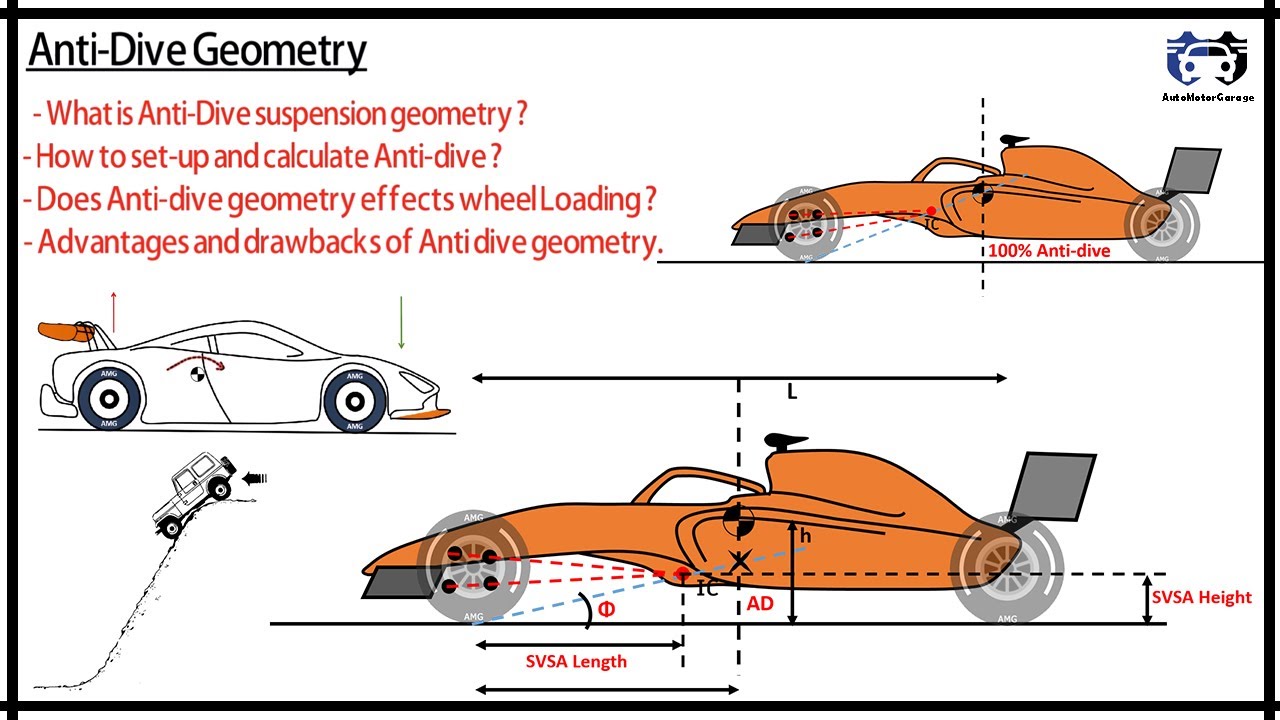
Anti-dive controls front suspension compression under braking. Anti-squat controls rear suspension compression under acceleration. They are mechanically separate circuits — front control arm geometry versus rear link geometry — but dynamically coupled through load transfer and roll center migration. If your complaint is nose dive and instability under braking, look at anti-dive. If your complaint is rear squat and lost traction on launch, look at anti-squat. [MODEL_ANALYSIS]
Anti-dive is generated by angling the front upper and lower control arms so the instant center — the theoretical pivot point around which the suspension rotates — creates a torque reaction opposing the dive force. Under braking, weight transfers forward and compresses the front suspension. Control arm geometry can create a force that resists this compression, reducing how much the nose drops. [SEARCH_EVIDENCE]
Anti-squat works the same way at the rear. By angling the rear links — trailing arms, lower control arms, or a 4-link setup — you move the instant center to a location that resists the squat force generated under acceleration. The rear suspension compresses less, keeping the tire contact patch more stable and maintaining pinion angle. [SEARCH_EVIDENCE]
Both are expressed as a percentage of total weight transfer the geometry resists. 100% anti-squat means the rear suspension theoretically does not compress under acceleration — all weight transfer is absorbed by geometry rather than springs. [MODEL_ANALYSIS]
How to Calculate Anti-Squat Percentage: A Worked Example with Real Numbers
The classic anti-squat formula is:
Anti-Squat % = (tan θ × wheelbase / CG height) × 100
where θ is the angle of the line from the rear tire contact patch to the instant center — not the link angle itself. This distinction matters. If you measure the link angle and plug it into the formula, you will get the wrong percentage and make the wrong adjustment. [SEARCH_EVIDENCE]
Step-by-step: locating the instant center
- On a 4-link or trailing-arm rear suspension, draw lines through the upper and lower links in side view. Extend them until they intersect. That intersection is the instant center.
- Draw a line from the rear tire contact patch to that instant center. The angle of this line relative to horizontal is θ.
- Measure θ with an angle finder or calculate it from your drawing.
If the links are parallel, the instant center is at infinity and the line from the contact patch is horizontal — θ = 0°, which gives 0% anti-squat. [MODEL_ANALYSIS]
Worked example
Assume a 108-inch wheelbase and a 20-inch CG height. You locate the instant center and find the line from the rear tire contact patch to the instant center is at a 6-degree angle:
- tan 6° = 0.1051
- 0.1051 × 108 = 11.35
- 11.35 / 20 = 0.5675
- 0.5675 × 100 = 56.8% anti-squat
That means the geometry resists 56.8% of the weight transfer that would otherwise cause the rear to squat. The remaining 43.2% is absorbed by the springs and shocks. [MODEL_ANALYSIS]
Sensitivity: how each variable shifts the result
Small measurement errors or vehicle changes move the percentage more than most people expect.
- CG height: If CG height drops from 20 to 19 inches with the same 6° instant-center angle, anti-squat becomes (0.1051 × 10⁸) / 19 × 100 = 59.7% — a 1-inch CG change moves the result by nearly 3 percentage points.
- Wheelbase: Stretching the wheelbase from 108 to 112 inches with the same angle and CG gives (0.1051 × 112) / 20 × 100 = 58.9%.
- Instant-center angle: Changing θ from 6° to 7° gives (0.1228 × 10⁸) / 20 × 100 = 66.3% — a 1-degree angle change moves the result by almost 10 percentage points.
This is why you must measure at ride height with the car loaded as it will be driven. A car that is lowered or raised from stock will have a different instant-center location and a different anti-squat percentage than the factory specification. [MODEL_ANALYSIS]
Measure CG height using a scale-and-lift method or obtain it from the manufacturer's data. Do not estimate it from curb weight alone — CG height changes with load, fuel level, and suspension ride height. [MODEL_ANALYSIS]
Measure link angles with an angle finder on the actual vehicle at ride height, not from a spec sheet. [SEARCH_EVIDENCE]
Adjusting Anti-Dive and Anti-Squat on Double-Wishbone, MacPherson Strut, and 4-Link Suspensions
On a double-wishbone suspension, anti-dive is tuned by changing the angle of the upper and lower control arm pivot axes. Anti-squat is tuned by adjusting the rear upper and lower link angles. Many aftermarket arms have slotted mounts or adjustable rod ends that let you change these angles without fabrication. [SEARCH_EVIDENCE]
On a MacPherson strut, anti-dive is primarily set by the lower control arm angle and the strut rod geometry. Adjustment is limited without modifying the strut tower. Camber/caster plates that relocate the top of the strut can alter the instant center, but the range is small — typically a few tenths of a degree of instant-center angle change. If you need a significant anti-dive change on a strut car, slotting the strut tower or fabricating new lower control arm mounts is a fabrication-level change, not a bolt-on adjustment. [MODEL_ANALYSIS]
On a 4-link or off-road suspension, anti-squat is tuned by changing the vertical separation of the upper and lower links at the axle and frame ends. Moving the upper link up at the frame raises anti-squat. Moving it down lowers anti-squat. The same logic applies at the axle end. [SEARCH_EVIDENCE]
In all cases, changing link angles affects other geometry — roll center, pinion angle, bump steer. Document your baseline alignment before and after any change. A change that fixes squat may introduce a pinion angle vibration or alter roll center enough to change handling balance. [MODEL_ANALYSIS]
What Anti-Dive and Anti-Squat Actually Do to Braking Stability, Launch Traction, Corner Entry, and Tire Wear
Anti-dive reduces nose-down pitch under braking. This can improve brake stability and reduce front tire contact patch distortion. But excessive anti-dive can cause the front tires to skip or lock prematurely because the suspension cannot absorb weight transfer — the geometry is doing all the work, and the tire is fighting the road surface instead of following it. [SEARCH_EVIDENCE]
Anti-squat increases rear tire loading under acceleration. This can improve launch traction up to a point. Beyond roughly 60–70% on a street car, many tuners report that the rear suspension becomes too stiff in compression and loses compliance over bumps. The tire may skip under hard acceleration, especially on uneven surfaces. Optimal values are vehicle- and tire-dependent, so treat this as a starting point for testing, not a rule. [MODEL_ANALYSIS]
Corner entry is where anti-dive has the most nuanced effect. High anti-dive can make the front end feel vague or darty because the suspension has less travel to manage load transfer. Low anti-dive gives more progressive weight transfer but more pitch. For a track car, some anti-dive can sharpen turn-in; for a street car, too much makes the car feel nervous. [MODEL_ANALYSIS]
Tire wear is the long-term consequence. Excessive anti-squat or anti-dive concentrates load on a smaller portion of the contact patch. This accelerates inner or outer shoulder wear and increases tire temperatures unevenly. If you see uneven wear across the tire face and your alignment is correct, your anti-geometry may be too aggressive. [SEARCH_EVIDENCE]
Cause-and-effect: percentage ranges and driver feedback
| Anti-squat % | Typical driver feedback | Likely tire wear pattern |
|---|---|---|
| 0–20% | Rear squats noticeably on launch; soft, compliant ride; rear may feel loose under hard acceleration | Even wear; rear tires may spin early |
| 20–40% | Moderate launch stability; comfortable street ride; some squat under heavy load | Even wear; good compromise for daily driving |
| 40–60% | Strong launch bite; firmer ride; rear feels planted on smooth surfaces | Slight inner shoulder wear possible if alignment is aggressive |
| 60–80% | Very firm; rear skips on bumps; traction may drop on uneven surfaces | Inner shoulder wear; uneven temperatures across the tire face |
| 80–100% | Harsh; rear suspension nearly rigid under acceleration; poor bump absorption | Accelerated inner shoulder wear; tire skipping under load |
Use this table as a diagnostic starting point. If your car exhibits the feedback in a row, your anti-squat is likely in that range. Adjust in small increments and re-measure. [MODEL_ANALYSIS]
Common Misconceptions: Why More Anti-Squat Doesn't Always Mean More Traction
Myth: 100% anti-squat is ideal for drag racing. In reality, tire compound, track prep, and power level determine the optimal percentage. Common ranges reported in racing literature for fast cars are 40–70% anti-squat. Too much anti-squat can cause the rear tire to unload on bumps and lose traction. [SEARCH_EVIDENCE]
Myth: Anti-dive improves braking distance. It can improve stability and pedal feel, but braking distance is dominated by tires, ABS calibration, and weight distribution. Excessive anti-dive can increase distance by reducing suspension compliance, causing the tire to skip instead of maintaining contact. [MODEL_ANALYSIS]
Myth: You can copy a setup from a forum. Anti-squat percentage is vehicle-specific because it depends on CG height, wheelbase, and tire grip. A number that works on a 2,800 lb coupe will not work on a 4,500 lb SUV. The same percentage on a different car can produce completely different handling. [MODEL_ANALYSIS]
Myth: Anti-squat and anti-dive are free. They trade off ride comfort, bump absorption, and tire wear. They also interact with roll center and camber curves. Every change you make to anti-geometry has a secondary effect somewhere else in the suspension system. [SEARCH_EVIDENCE]
How Anti-Dive and Anti-Squat Interact with ESC, ABS, and Regenerative Braking — and What That Means for EVs
ESC and ABS modulate brake pressure faster than any geometry change can react. Anti-dive's role shifts from preventing lockup to managing pitch for driver confidence and sensor consistency. The electronics handle tire slip; the geometry handles body motion. [MODEL_ANALYSIS]
Regenerative braking in EVs applies negative torque to the drive wheels. This can induce squat or dive depending on whether the motor is front or rear. A front-motor EV under regen will dive more; a rear-motor EV under regen will squat more. This changes the anti-squat requirement compared to a conventional car. [MODEL_ANALYSIS]
EVs have lower CG and higher curb weight than equivalent ICE vehicles. The lower CG reduces the amount of weight transfer, but the higher weight increases the force. The net effect on anti-squat percentage depends on which change dominates. Consider a simplified comparison:
- ICE vehicle: 108-inch wheelbase, 20-inch CG height, 3,500 lb. Weight transfer under 0.5 g acceleration = (3,500 × 0.5 × 20) / 108 = 324 lb.
- EV: Same wheelbase, CG height drops to 18 inches, weight rises to 4,200 lb. Weight transfer = (4,200 × 0.5 × 18) / 108 = 350 lb.
The EV transfers slightly more total weight despite the lower CG because the weight increase outweighs the CG reduction. To resist that transfer with geometry, the EV may need a slightly higher anti-squat percentage — but the difference is small, and excessive anti-squat is more punishing for ride comfort because of the added mass. The net effect is vehicle-specific; measure and test rather than assuming. [MODEL_ANALYSIS]
Heavy-duty and commercial vehicles with air suspension may have adjustable link geometry or ride height sensors that interact with anti-squat. Tuning must account for load-dependent ride height changes. A truck set up for empty ride height will have different anti-squat when loaded. [SEARCH_EVIDENCE]
Balancing Anti-Dive and Anti-Squat for Mixed-Use Vehicles: When to Prioritize One Over the Other
Use this decision matrix to prioritize based on your primary use case:
| Primary use | Priority | Suggested starting range | Key trade-off |
|---|---|---|---|
| Daily driver / street | Moderate anti-squat, mild anti-dive | 30–50% anti-squat, 10–30% anti-dive | Ride comfort and tire wear |
| Track / autocross | Higher anti-dive, tuned anti-squat | 30–50% anti-dive, 40–60% anti-squat | Corner-exit balance and turn-in sharpness |
| Drag / launch | Anti-squat focused | 40–70% anti-squat, low anti-dive | Bump compliance and tire skip |
| Off-road / towing | Anti-squat for load, articulation | Tune for loaded condition | Articulation and empty-condition ride |
These ranges are starting points reported by tuners and in racing literature. Optimal values are vehicle- and tire-dependent. [MODEL_ANALYSIS]
Decision flowchart for mixed-use vehicles
- Is the car primarily a daily driver? If yes, start with 30–50% anti-squat and 10–30% anti-dive. Test ride comfort and tire wear.
- Does the car see track or autocross use? If yes, increase anti-dive toward 30–50% for turn-in sharpness. Tune anti-squat to put power down without corner-exit understeer or snap oversteer.
- Does the car tow or carry heavy loads? If yes, tune anti-squat for the loaded condition, not the empty condition. Accept reduced articulation.
- Is the car a dedicated drag car? If yes, prioritize anti-squat in the 40–70% range and accept reduced bump compliance.
- After any change, verify with the methods below before making another adjustment.
For a daily driver, a car with 80% anti-squat will feel stiff and skittish on rough roads. For track use, a car that is too aggressive in either direction will be difficult to drive at the limit. The goal is balance, not maximum. [MODEL_ANALYSIS]
For off-road or towing, anti-squat is critical for keeping the rear from sagging under load. But too much reduces articulation. Tune for the loaded condition, not the empty condition. A truck set up for empty ride height will squat excessively when loaded. [SEARCH_EVIDENCE]
Ride comfort is the final trade-off. Every increase in anti-dive or anti-squat reduces suspension compliance over bumps. Use adjustable links or brackets to test changes without permanent fabrication. Start with small changes, measure the effect, and adjust from there. [MODEL_ANALYSIS]
How to Verify Your Change: Low-Cost Validation Methods
You cannot tune what you cannot measure. Before and after any anti-dive or anti-squat change, use at least two of these methods to confirm the effect:
- Zip-tie on the shock shaft: Place a zip-tie around the shock shaft. It will be pushed up by the bump stop or seal under compression. Measure how far it travels under braking or acceleration before and after your change. Less travel means more anti-geometry. [MODEL_ANALYSIS]
- Phone-based accelerometer: Use a phone app to log longitudinal acceleration under braking and acceleration. A change in pitch behavior will show up as a change in the acceleration trace shape, especially during the initial weight-transfer phase. [MODEL_ANALYSIS]
- Chalk on the tire: Draw a chalk line across the tire tread. After a braking or acceleration run, inspect how the chalk wore. Uneven wear across the line indicates the contact patch is not loading evenly — a sign your anti-geometry may be too aggressive. [MODEL_ANALYSIS]
- Tire pyrometry: Measure tire temperatures across the tread with a probe pyrometer immediately after a run. A large temperature spread from inner to outer shoulder suggests uneven loading. [MODEL_ANALYSIS]
- Skidpad or braking distance test: Measure braking distance from a fixed speed or cornering speed on a skidpad before and after the change. Use the same location, surface, and conditions. A change that improves stability but increases braking distance is a trade-off you need to know about. [MODEL_ANALYSIS]
Document your baseline before you start. Without a baseline, you cannot tell whether a change helped or hurt. [MODEL_ANALYSIS]
FAQs
What is a good anti-squat percentage for a street car?
30–50% is a practical starting range for most street cars, reported by tuners and in racing literature. This provides enough launch stability without making the ride harsh. Optimal values are vehicle- and tire-dependent, so test and adjust. [MODEL_ANALYSIS]
Can I adjust anti-dive and anti-squat independently?
They are mechanically separate circuits — front control arm geometry versus rear link geometry — but dynamically coupled through load transfer and roll center migration. Changing front anti-dive can alter the roll center, which affects rear grip and therefore how the rear anti-squat behaves in a corner. You can adjust them separately, but you must test the combined effect. [MODEL_ANALYSIS]
Does anti-squat help with towing?
Yes, anti-squat helps keep the rear from sagging under load. But tune for the loaded condition, not the empty condition. [SEARCH_EVIDENCE]
How do I measure link angles?
Use an angle finder on the actual vehicle at ride height. Do not rely on spec sheets because ride height changes alter the instant center. Remember that the formula uses the angle from the contact patch to the instant center, not the link angle itself. [SEARCH_EVIDENCE]
What happens if I have too much anti-dive?
The front suspension becomes too stiff in compression, causing the tires to skip or lock prematurely under braking. This can increase braking distance and reduce steering feel. [SEARCH_EVIDENCE]
Conclusion
Anti-dive and anti-squat are tuning windows, not magic numbers. Calculate your current percentages using the instant-center angle, measure your link angles at ride height, and make small changes. Prioritize based on your driving use: braking stability for track, launch traction for drag, load carrying for towing. Verify every change with zip-ties, chalk, or a phone accelerometer before making the next adjustment. Every change has a trade-off — ride comfort, tire wear, and handling balance are all affected. Use adjustable components to test changes without permanent fabrication, and document your baseline before you start. [MODEL_ANALYSIS]
---
Related
- Large suspension bushing — 54584-2D000 — adjustable bushings can be used to fine-tune link angles for anti-squat changes without replacing the entire arm.
- Large suspension bushing — 54584-3S100 — stiffer bushings reduce deflection under load, which helps maintain your measured anti-squat percentage under acceleration.
- Large suspension bushing — 54584-BU000 — for high-load towing or off-road applications, bushing stiffness affects how consistently your anti-squat geometry performs.