Strut Top Mount Replacement: Diagnose First, Then Decide Mount-Only vs. Full Assembly

If you hear a dull clunk over low-speed bumps or feel the steering wheel stop self-centering smoothly, the strut top mount — not the damper — is the most likely failed part. Confirm that before you order anything, because the mount, the damper, and the upper bearing fail differently, and the mount-only vs. full-assembly decision changes both cost and outcome. Replace mounts in pairs, inspect the spring seat and bump stop while the strut is apart, and choose OE-quality rubber and bearing construction over the cheapest aftermarket option — the labor cost of a premature failure outweighs the parts savings.
Match the Symptom to the Failed Part
Use the symptom pattern to narrow the suspect before you lift the car. The three failure modes — mount rubber, damper, and upper bearing — produce distinct noises and steering feel.
| Symptom | Most likely failed component | Confirm with |
|---|---|---|
| Dull, hollow clunk over low-speed bumps | Strut top mount rubber separation | Pry test between mount and strut tower |
| Harsh metallic knock, visible fluid seepage on damper body | Damper | Bounce test and visual fluid check |
| Steering wheel not self-centering smoothly; spring twang when turning at standstill | Seized or dry strut top bearing | Bearing race debris check; pry test for bearing play |
| Clunk remains after mount replacement | Sway bar link or control arm | Re-check those components on test drive |
Misdiagnosis is expensive in both directions: replacing a good strut because the mount was clunking, or replacing a mount when the damper is blown, leaves the noise and the handling problem in place. Separate the three before ordering parts.
How to Inspect the Mount (Visual and Pry Test)
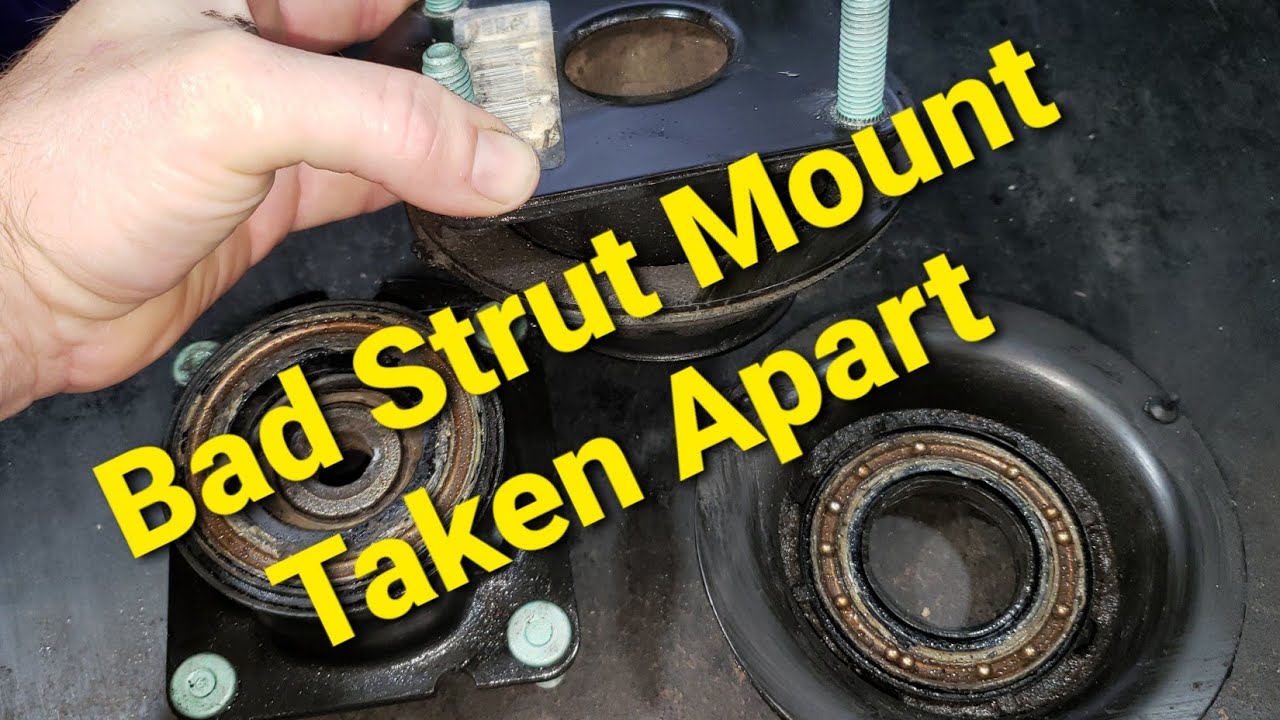
With the vehicle safely raised and the suspension unloaded, pry between the mount and the strut tower using a pry bar. Excessive movement — more than a few millimeters — confirms mount rubber separation or upper bearing play. Visually check for cracked, separated, or missing rubber and for bearing race debris around the mount. A healthy mount shows intact rubber and no free play.
A bounce test on the damper confirms whether the strut itself is still controlling the spring. If the damper passes and the mount fails the pry test, you have a mount-only job. If the damper fails or shows fluid leakage, plan for a full assembly.
Mount-Only vs. Full Assembly: The Decision That Changes Cost and Outcome
Replace the mount only when the damper passes a bounce test, shows no fluid leakage, and the spring and seat are intact. Replace the full assembly when the damper is worn, the spring is corroded, or the vehicle uses a sealed quick-strut design.
Always replace strut top mounts in pairs. The opposite side has seen the same mileage and rubber age, and a mismatched pair can cause uneven handling and a second alignment bill.
Inspect the spring seat, bump stop, and dust boot during the job. A collapsed bump stop or cracked seat will destroy a new mount quickly and is cheaper to replace now than to revisit later.
Tools, Safety, and the Spring Compressor Warning That Prevents Injury
Essential tools: a spring compressor matched to your spring diameter, a torque wrench, a socket set, hex/Allen keys for the strut-to-mount nut, jack stands, and a pry bar for the diagnostic check.
A compressed coil spring stores lethal energy. Use a quality spring compressor with locking pins, compress evenly on opposite sides, and never point the assembly at your body.
The strut-to-mount nut is often a counter-hold design (hex key through the socket). Using an impact gun without counter-hold can spin the damper shaft and damage the new mount bearing.
Step-by-Step Replacement: From Wheel Off to Torque Specs
Secure the vehicle on jack stands, remove the wheel, disconnect the sway bar link and brake line bracket, then unbolt the strut-to-knuckle bolts and the upper mount nuts.
Compress the spring evenly, remove the strut-to-mount nut using the counter-hold method, swap the mount and bearing, and reassemble in reverse order.
Torque the strut-to-mount nut, upper mount nuts, strut-to-knuckle bolts, and wheel bolts to the vehicle manufacturer's specifications. Exact torque values vary by model and must be sourced from the OEM service data for your specific vehicle — do not guess or substitute a generic figure.
Alignment, Test Drive, and the Checks That Confirm the Fix
An alignment is required after strut mount replacement because removing and reinstalling the strut changes camber and toe; skipping it causes uneven tire wear and off-center steering.
Test drive at low speed over bumps to confirm the clunk is gone, then at highway speed to check for steering pull or vibration. A remaining clunk may indicate a sway bar link or control arm issue.
Re-check torque on the strut-to-mount nut and upper mount nuts after the first 50–100 miles, as rubber settling can reduce clamp load.
Cost Factors: DIY Parts vs. Shop Labor, and Why Brand Tier Matters
Actual prices vary widely by model, region, and supplier, so treat the following as a framework rather than a quote.
- Mount-only replacement — lowest parts cost. You reuse the damper and spring, but you pay for spring compressor time and risk.
- Mount-plus-bearing kit — mid-range parts cost. Covers the bearing that commonly fails alongside the rubber.
- Full quick-strut assembly — highest parts cost, lowest labor time. Eliminates spring compressor risk and reduces per-side labor.
Shop labor is typically quoted per side and includes alignment; the pair-replacement rule means budgeting for both sides plus one alignment, not two separate visits.
Budget aftermarket mounts may use lower-grade rubber and unsealed bearings that fail prematurely; OE-quality mounts use rubber compounds and sealed bearings designed for the service life of the vehicle, and the labor cost of a premature failure outweighs the parts savings.
Driving on a Failed Mount: Tire Wear, NVH, and Safety Consequences
A failed mount allows the strut to move out of position, changing camber and toe dynamically and causing uneven, accelerated tire wear.
NVH increases: clunking becomes constant, steering feel degrades, and the bearing can seize, causing spring twang and poor self-centering.
In extreme cases, the strut can separate from the mount, leading to loss of suspension control; the mount should be treated as a safety-critical part, not a comfort item.
Manufacturer Insight: Rubber Compound and Bearing Seals Drive Longevity
Rubber compound and bonding quality determine resistance to ozone, heat, and fatigue; a mount that uses a lower-grade rubber can crack and separate prematurely even if the dimensions are correct.
Bearing seal quality protects the upper bearing from water and road salt; an unsealed or poorly sealed bearing dries out, seizes, and causes steering memory and spring twang.
OE-quality mounts are engineered to the vehicle's NVH and durability targets, while budget aftermarket mounts may meet dimensions but not the rubber and bearing durability requirements. When evaluating suppliers, ask for rubber compound specifications and bearing seal type — not just fitment. Our automotive suspension components are manufactured with these durability criteria in mind, and our quality control processes focus on rubber bonding and bearing seal integrity.
FAQ
Can I drive on a failed strut top mount?
It is a safety-critical part. Early-stage noise and vagueness progress to constant clunking, degraded steering feel, and accelerated tire wear. In extreme cases the strut can separate from the mount, causing loss of suspension control. Treat any confirmed mount failure as a prompt repair, not a deferred one.
What torque spec applies to my model?
Exact torque values for the strut-to-mount nut, upper mount nuts, strut-to-knuckle bolts, and wheel bolts vary by vehicle. Source them from the OEM service data for your specific model — do not substitute a generic figure.
Why replace strut top mounts in pairs?
The opposite side has seen the same mileage and rubber age. A mismatched pair can cause uneven handling and a second alignment bill.
What causes steering memory and spring twang?
A seized or dry strut top bearing — not a worn damper. The bearing can dry out when its seal fails and road salt and water reach the race.
How soon should I re-check torque after the job?
Re-check the strut-to-mount nut and upper mount nuts after the first 50–100 miles, as rubber settling can reduce clamp load.
---
Related