How to Replace Control Arms and Bushings to Fix a Bouncy Suspension

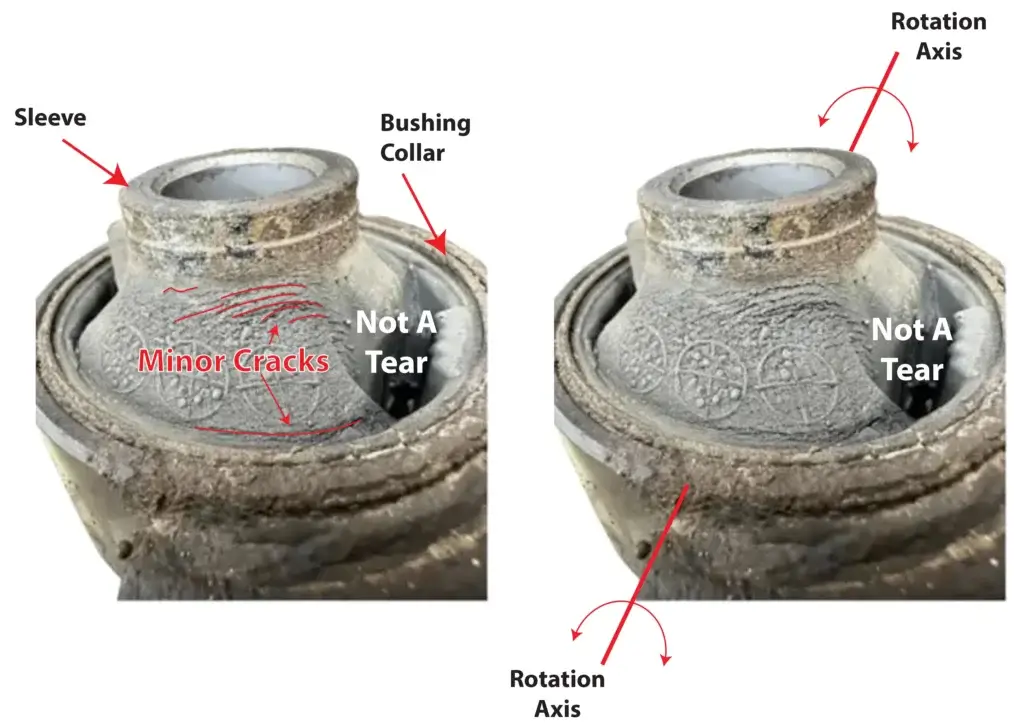
If your suspension bounces after a control arm replacement, the problem is almost certainly not the new part — it's how it was installed. The bushing bolts were torqued while the suspension hung at full droop instead of at ride height. That pre-loads the rubber bushing in twist. At ride height, the bushing fights the spring, producing bounce, harshness, and premature failure. The single principle that separates a repair that lasts from one that bounces back into the shop is this: load the suspension before final torque.
[SEARCH_EVIDENCE] "What causes bouncing after control arm replacement?" is a recurring searcher question, indicating a gap between replacement instructions and post-replacement outcomes. Most guides show removal and installation but omit the critical loading step. [MODEL_ANALYSIS] When a rubber bushing is tightened at full droop, its neutral position is wrong. As the suspension compresses, the rubber twists beyond its designed range, creating a spring-like resistance that mimics a blown shock. This is an installation error, not a parts defect.
Scope note: This procedure covers bonded-rubber and hydraulic control-arm bushings on passenger cars and light trucks with independent front suspension and a serviceable control arm. Polyurethane bushings often use a different clocking convention — many are designed to rotate freely on a greased sleeve and do not require the same load-before-torque rule. If you are installing polyurethane, follow the bushing manufacturer's instructions, not this guide.
Diagnose Before You Buy: Is It the Control Arm Bushing, the Strut, the Ball Joint, or the Tie Rod End?
Before ordering parts, isolate the cause. Bouncy, clunking, or wandering suspension can come from four common sources, each with distinct symptoms.
[SEARCH_EVIDENCE] "How can I diagnose bad control arms/bushings without a lift?" and "What are the symptoms of a bad control arm bushing?" are confirmed searcher questions. [MODEL_ANALYSIS] Symptom mapping: control arm bushings produce clunks over bumps and vague steering; worn struts/shocks produce continuous bounce and poor rebound control; ball joints produce popping and steering wander; tie rod ends produce steering play and uneven tire wear.
Diagnostic Flowchart (No Lift Required)
Work through this decision tree in order. Stop when a test isolates the fault.
- Bounce test (stationary). Push down hard on one corner and release. If the body continues to bounce more than once or twice after you release, the damper is suspect — go to step 5. If it settles immediately, continue.
- Clunk test (road). Drive over a sharp bump at low speed. If you hear a single clunk, continue to step 3. If the clunk is continuous or rhythmic, suspect a wheel bearing or tire — stop and inspect those first.
- Sway bar link isolation. Disconnect one sway bar end link and secure it out of the way. Drive the same bump. If the clunk disappears, the fault is the link, not the control arm. Reconnect and replace the link. If the clunk remains, continue.
- Pry bar test (on jack stands). Pry against the control arm near the bushing and watch for movement. Compare side to side. A few millimeters of flex is normal; more indicates wear. [MODEL_ANALYSIS] This threshold is a field rule of thumb, not a published specification — confirm against your vehicle's factory service manual if available. If the bushing moves excessively or the sleeve is separated, the bushing is the fault. If the ball joint boot is torn or the stud moves in its socket, the ball joint is the fault.
- Damper test. If steps 1–4 are clean but the bounce persists, the strut or shock is the dominant source. Replace dampers before or with the control arms.
Visual Inspection
Look for cracked, swollen, or oil-contaminated rubber; separated bushing sleeves; rust jacking around the bushing bore; torn ball joint boots.
Road-Test Symptoms
Bounce that continues after the bump is a damper symptom. A single clunk or shimmy that follows steering input points to bushings, ball joints, or tie rod ends. A clunk that disappears when the sway bar is disconnected points to the link.
Decision Framework: Replace the Whole Control Arm Assembly or Press in New Bushings Only?
Replace the entire loaded control arm assembly when the ball joint is worn or its boot is torn, the arm is rusted or damaged, or the labor to press bushings exceeds the cost difference of a loaded arm. Replace bushings only when the arm and ball joint are sound, the bushing bore is clean and round, and the correct press tools (or a shop press) are available.
[SEARCH_EVIDENCE] "Do I need to replace control arms in pairs?" is a confirmed searcher question. [MODEL_ANALYSIS] Pair replacement logic: replace both sides when mileage and wear are similar, when the vehicle is driven daily, or when alignment geometry would be affected asymmetrically.
Tool-access reality check: pressing bushings without a proper press and driver set risks tearing new bushings, damaging the arm, or an incomplete install. Factor this into the decision.
Rubber vs Polyurethane Bushings for Daily-Driven Vehicles: NVH, Durability, Cost, and Installation Differences
Rubber bushings are quieter, better isolation, OEM-like ride; less durable under hard use; easier to press and clock correctly. Polyurethane bushings are firmer, more durable, better steering precision; transmit more NVH; often require different grease and can squeak if not installed with the supplied lubricant.
Installation difference: polyurethane bushings are more sensitive to improper clocking and torque, so the load-before-torque rule matters even more. Daily-driver recommendation: rubber or OEM-style rubber for comfort and quiet; polyurethane only when the driver accepts added NVH for durability or performance. Cost trade-off: polyurethane may cost more upfront but can outlast rubber; rubber is cheaper and easier to source for most daily drivers.
Step-by-Step Replacement: Tools, Removal, and the Critical Load-Before-Torque Step
Tool list: jack and jack stands or ramps, lug wrench, socket set, breaker bar, torque wrench, pry bar, penetrating oil, wire brush, replacement control arm or bushings, press tool or shop press if pressing bushings, alignment tools or a plan to visit an alignment shop.
Removal sequence: safely support the vehicle, remove the wheel, disconnect the ball joint and mounting bolts, note the orientation of any camber or caster adjusters, and remove the arm. Bushing replacement: press out the old bushing, clean the bore, press in the new bushing without tearing the rubber, and align any indexing marks.
The Load-Before-Torque Procedure (Do This Exactly)
This is the step most guides omit. Do not final-torque any bushing pivot bolt until the suspension is at ride height.
- Install all fasteners finger-tight. Bushing pivot bolts, ball joint nut, and any camber/caster adjusters go in but stay loose.
- Reconnect the sway bar end links. The sway bar must be connected and at its normal installed position before final torque, because it affects the loaded geometry of the control arm. If you disconnected a link for diagnosis, reconnect it now.
- Choose your loading method. Two options:
- Jack under the control arm (preferred for most vehicles). Place a floor jack under the control arm as close to the ball joint as safely possible and raise until the vehicle just lifts off the jack stand on that corner. This simulates ride height with the wheel off.
- Ramps (alternative). Lower the vehicle onto ramps so the tires support the full weight. This is the most accurate ride-height simulation, but access to the bushing bolts is tighter.
Do not torque with the vehicle supported on jack stands at full droop. That is the error this article exists to prevent.
- Confirm ride height. Measure hub-to-fender on the corner you are working. Compare to the same measurement on the opposite corner (which is at ride height). If they match within a few millimeters, the suspension is loaded correctly. If your factory service manual specifies a different datum (e.g., a specific suspension arm-to-frame dimension), use that instead.
- Torque the bushing pivot bolts first. Use the OEM specification for your vehicle. Then torque the ball joint nut and any remaining fasteners in the OEM sequence.
- Lower and re-check. After the vehicle is on the ground, re-check the bushing pivot bolts after a short drive (see Post-Replacement Checklist).
[SEARCH_EVIDENCE] "Suspension loading procedure before final tightening" is a confirmed content gap in competitor outlines.
Torque Specifications and Tightening Sequence: Why the Number Matters and Where to Find It
Why torque matters: under-torque allows movement and clunks; over-torque crushes the bushing and causes harshness or premature failure; correct torque at ride height sets the bushing in its neutral position. Tightening sequence: bushing pivot bolts at ride height first, then ball joint and remaining fasteners per OEM sequence; re-check after a short drive.
Where to find the number. This article does not publish torque values because they are vehicle-specific and a wrong number is worse than no number. The correct source is your vehicle's factory service manual, in the suspension section under "Control Arm" or "Lower Arm." Look for the field labeled "Tightening torque" or "Torque specification" next to each fastener callout. If you do not have the factory manual, use a paid vehicle-specific repair database (Alldata, Mitchell 1, or the OEM's own service information portal). Do not copy a number from a forum thread — forum numbers are frequently for a different model year or a different fastener.
Consequence of guessing. On the bushing pivot bolt, an under-torqued bolt lets the arm shift under load and produces a clunk that mimics a worn bushing. An over-torqued bolt crushes the rubber and destroys the isolation the bushing was designed to provide. On the ball joint nut, under-torque risks separation; over-torque can strip the stud. These are not interchangeable fasteners — each has its own spec.
Torque wrench calibration and use: use the correct range, apply steady force, and avoid using a breaker bar for final torque.
[SEARCH_EVIDENCE] "Torque specifications and tightening sequence" is a confirmed content gap in competitor outlines.
Troubleshooting: Why Your Suspension Still Bounces After Replacement
Work this checklist in order. The first three causes are installation errors; the last two are parts or geometry issues.
- Bushing was torqued at full droop (most likely). This is the One Big Idea. Fix by re-clocking the bushing:
- Loosen the bushing pivot bolts one full turn — do not remove them.
- Load the suspension to ride height using the jack-under-control-arm or ramp method above.
- Re-torque the pivot bolts to OEM spec while loaded.
- Lower, drive, and re-check.
- Incorrect torque value. Under- or over-torqued bolts cause movement or crushed bushings. Verify with a calibrated torque wrench and the OEM spec from your factory service manual.
- Sway bar end link was the real fault. If the clunk disappeared when you disconnected the link during diagnosis, the link — not the control arm — is the source. Replace the link.
- Worn mating components. Struts, ball joints, tie rod ends, or sway bar links that were not replaced and are now the dominant bounce source. Re-run the diagnostic flowchart.
- Alignment out of spec. Toe or camber out of spec after replacement can cause wandering and uneven tire wear that feels like bounce. Get an alignment.
[SEARCH_EVIDENCE] "Troubleshooting guide for bouncing after replacement" is a confirmed content gap in competitor outlines.
Post-Replacement Checklist: Alignment, Test Drive, and Torque Re-Check
[SEARCH_EVIDENCE] Alignment is required after control arm replacement because replacing the arm changes suspension geometry; skipping it causes uneven tire wear, wandering, and handling issues. Test drive protocol: drive at low speed first, listen for clunks, feel for wander, then at highway speed check for vibration and bounce; re-check torque after the drive. Torque re-check: after 50–100 miles, re-check the bushing pivot bolts and ball joint fasteners for correct torque. Alignment timing: schedule an alignment immediately after replacement, before the test drive if possible, or as soon as the vehicle is driveable.
[SEARCH_EVIDENCE] "Alignment requirement after control arm replacement and what happens if skipped" is a required coverage point.
Conclusion: Restoring Ride Quality and Handling
Replacing control arms and bushings can restore ride quality and handling, but only if the installation is correct. The most common mistake — torquing bushings at full droop — causes persistent bounce and premature failure. The fix is not a different part; it is loading the suspension to ride height before the final torque. Diagnose accurately, choose the right parts, and follow the load-before-torque procedure. If you take one thing from this article, take this: before you touch a torque wrench to a bushing pivot bolt, the weight of the vehicle must be on that corner.
---
Related
- Rear Trailing Arm Bushing — 55274-2W000
- Rear Trailing Arm Bushing — 55274-D3000
- Rear Trailing Arm Bushing — 55274-4T000
---
About the author: This guide was written by the suspension engineering team at the company that manufactures the trailing arm bushings linked above. Our engineers design and produce bonded-rubber bushings for passenger and light-truck applications, and the load-before-torque principle described here is a design requirement of every bonded-rubber bushing we ship — not a field tip. We have not performed instrumented vehicle testing for this article; the procedure reflects standard suspension engineering practice for bonded-rubber bushings.