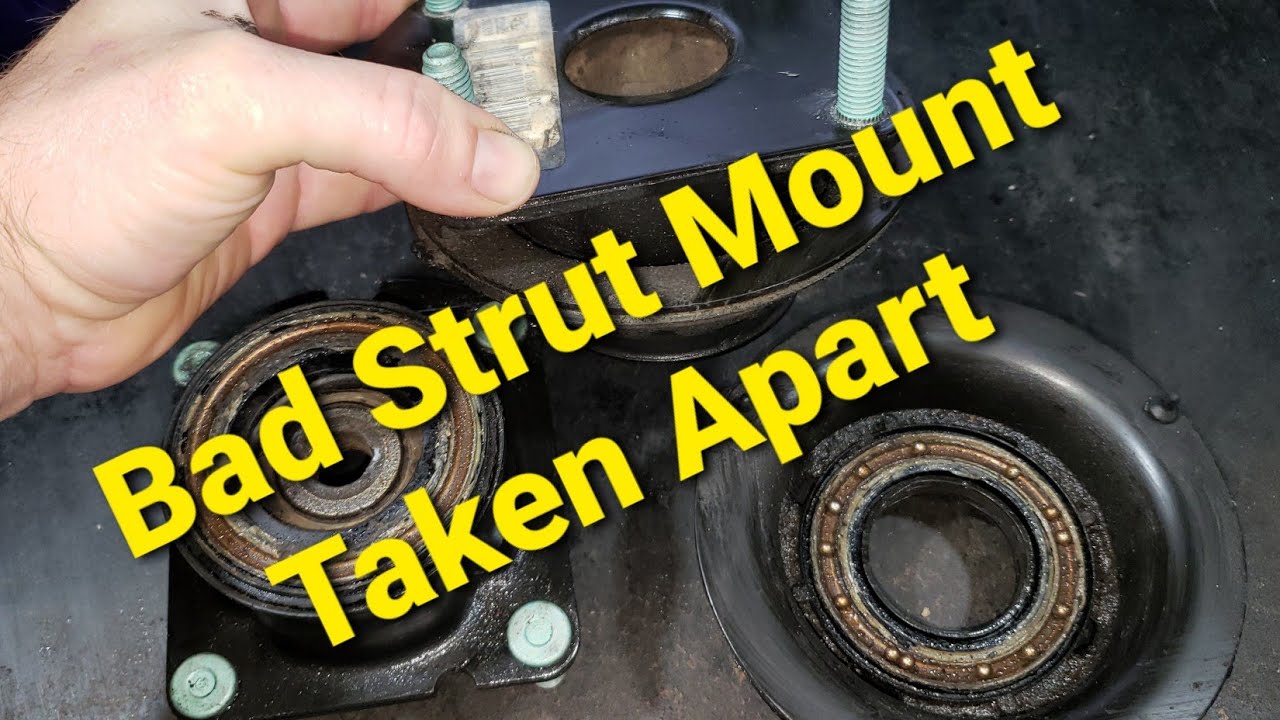
Strut Mount Bearing Replacement: Diagnose the Mount vs. the Bearing Before You Buy

A clunk over bumps points to the strut mount; steering that won't return to center or feels notchy points to the strut bearing. They fail differently, replace differently, and cost differently — and on high-mileage or corroded vehicles, both are usually due at once. Diagnose which one failed before you order anything.
The strut mount is a rubber-and-steel plate that isolates the strut from the body and carries the upper spring seat. The strut bearing is a flat thrust bearing inside or under the mount that lets the strut rotate with steering input. Misdiagnosing which one failed means buying the wrong part and repeating the job.
How the Bearing Works Inside the Mount
The bearing sits between the mount and the spring seat and acts as the pivot for the strut shaft as the wheels turn. It is a thrust bearing: it handles axial load while allowing rotation. When you turn the steering wheel, the strut shaft rotates within the mount, and the bearing carries that movement with minimal friction. In a cutaway of a strut mount bearing assembly, you can see the bearing race, the rubber isolator, and the center nut — the bearing is sandwiched between the mount and the spring seat.
That sandwich is why the two parts fail together so often. A dry bearing grinds and loads the rubber; collapsed rubber misaligns the race.
Symptoms That Point to the Bearing vs. the Mount
Mount failure is a compliance and isolation failure. The rubber cracks, separates from the steel plate, or the bearing plate develops vertical play. Result: clunks over bumps and visible rubber damage.
Bearing failure is a rotation failure. Grease washes out, seals fail, races grind. Result: steering memory (the wheel does not return to center cleanly), spring pop on turning, and grinding when you rotate the strut by hand.
The symptoms overlap because a failed bearing accelerates mount rubber degradation, and a collapsed mount misaligns the bearing race. On high-mileage vehicles, both are often due at the same time.
Confirm the Failure Before You Buy Parts
Confirm which component failed before ordering parts. This sequence separates mount failure from bearing failure without disassembling the strut.
Visual inspection: center nut offset, rubber cracking, bearing race condition
Raise the vehicle and inspect the strut mount.
- Center nut offset from the mount center: indicates bearing collapse or mount deformation.
- Rubber cracking or separation from the steel plate: mount failure.
- Lift the mount plate with a pry bar. Vertical movement indicates mount failure.
- If the bearing is exposed, check for a dry, gritty race or missing grease.
A worn strut mount bearing often shows an off-center center nut, cracked rubber, or a dry bearing race. Compare against a new unit to confirm.
Noise diagnosis: clunk vs. creak vs. steering vibration
- Clunking over bumps: mount.
- Creaking or popping during steering: bearing.
- Grinding when rotating the strut by hand: bearing race or grease failure.
- Steering memory — the wheel does not return to center smoothly or feels notchy: classic bearing symptom.
Diagnostic decision tree: which part to order
Use the combination of symptoms to decide what to buy:
- Clunk over bumps only, rubber visibly cracked or separated, no steering memory: replace the mount.
- Steering memory, notchy or grinding feel, no clunk: replace the bearing.
- Clunk plus steering memory: replace both. The bearing has loaded the rubber, or the collapsed mount has misaligned the race.
- Any symptom on a vehicle over 100,000 miles or with visible corrosion: replace both sides. Labor is the same, and the second failure is predictable.
Before committing to a procedure, establish whether the bearing can be accessed without full strut removal on your platform. That determines whether this is a bearing-only job or a full strut teardown.
Replacement Cost: What Drives the Range
Parts cost and labor hours vary widely by platform. On many vehicles, the mount and bearing are sold as a single assembly, so parts cost is one line item rather than two. Labor hours depend on vehicle design: full strut removal on both sides typically takes longer than a bearing-only shortcut, and some vehicles require more disassembly to reach the upper mount bolts.
Cost-only content ignores the diagnostic decision. Confirm which part failed before comparing prices.
Parts cost: mount only vs. mount + bearing
If the bearing is serviceable separately, you may pay less than replacing the entire mount assembly. If the mount rubber is also degraded, replacing both is more cost-effective long-term. Always verify whether your vehicle uses a combined assembly or separate components.
Labor cost: why some vehicles cost more
Vehicles with strut towers buried under cowl panels, or with additional components such as ABS sensors or brake lines in the way, require more labor. The no-removal shortcut can save time if applicable, but it is not universally safe.
When to replace both sides
Replace both sides when mileage is high (typically over 100,000 miles) or when corrosion is present. The labor is the same, and the second side is likely to fail soon after.
Safety First: Coil Spring Tension
The coil spring stores significant energy. Removing the strut nut without compressing the spring can release that energy violently. A spring compressor is mandatory before removing the strut nut on a fully assembled strut. Never remove the center nut without compressing the spring first.
Why spring compressors are mandatory for full disassembly
A spring compressor attaches to the coil spring and compresses it, removing tension from the strut mount and bearing. Attempting to remove the strut nut without compressing the spring can cause the spring to release explosively, leading to serious injury or death.
When the 'no strut removal' shortcut is safe — and when it is not
The shortcut is safe only when the bearing sits on top of the mount and the spring remains captured by the mount and body — the spring is still under load but not released. It is unsafe when the bearing is captured under the spring seat or when the mount must be separated from the spring to access the bearing. Attempting it risks spring seat damage and bearing race misalignment. On some platforms, the bearing is integral to the mount and cannot be serviced separately; on others, the bearing is a separate ring that can be swapped with the strut in place.
Step-by-Step Replacement (Full Strut Removal)
Follow this sequence for full strut removal. Bearing orientation and torque specs are critical.
Tools required
Spring compressor, socket set, torque wrench, jack stands, pry bar, penetrating oil.
Removing the strut assembly
Loosen the strut shaft nut slightly while the strut is in the vehicle (with the spring compressed). Raise the vehicle, remove the wheel, and disconnect the strut from the knuckle and upper mount. Remove the strut assembly.
Compressing the spring and removing the mount/bearing
Compress the spring until tension is off the mount. Remove the strut shaft nut, then remove the mount and bearing. Note the orientation of the bearing: the sealed or flanged face seats against the mount; the open or race face faces the spring seat. Installing it backward is a common DIY error that causes immediate noise and premature failure.
Installing the new bearing — orientation matters
The bearing must be seated with the alignment tab in the corresponding notch. Incorrect orientation can cause binding and premature wear. Ensure the bearing sits flat on the mount.
Reassembly and torque specs
Compress the spring, seat the bearing correctly, install the mount, hand-tighten the strut nut, install the assembly in the vehicle, then torque the strut nut and mount bolts in the specified order. The strut shaft nut is typically tightened with the spring compressed and, where the design allows, with the vehicle on the ground. Upper mount-to-body bolts are torqued to the manufacturer's spec — always verify against the specific vehicle's service data.
Step-by-Step Replacement (Without Removing the Strut)
This shortcut is safe only when the bearing is a separate ring on top of the mount, the spring remains captured by the mount and body, and the mount does not need to be separated from the spring. It is unsafe when the bearing is captured under the spring seat, the mount is integral with the bearing, or the spring must be compressed to access the bearing.
Vehicle-specific caveats
On many platforms, the mount and bearing are sold as a single assembly, making the shortcut moot. On others, the bearing is serviceable separately. Check your vehicle's design before attempting.
Risks: spring seat damage, bearing race misalignment
If the spring is not properly captured, it can shift and damage the spring seat. Misaligning the bearing race can cause immediate noise and premature failure.
After Replacement: Alignment and Break-In
Wheel alignment should be performed after replacing strut mounts because the mount position affects camber and caster geometry. Driving on a failed bearing causes tire cupping, spring seat wear, and alignment geometry drift (camber/caster change) — secondary damage that exceeds the cost of the bearing itself.
Why alignment is required
Replacing the mount or bearing changes the strut's position relative to the body, altering camber and caster. An alignment ensures the wheels are set to factory specs.
What to check in the first 100 miles
Listen for new noises, feel for steering memory, and verify the mount bolts remain torqued. Recheck torque after 100 miles.
Bearing Design and Why Aftermarket Quality Varies
Sealed bearings retain grease and block contamination; open bearings are vulnerable to water and grit ingress, which is a primary failure mode. Grease retention depends on seal integrity and race design; a bearing that loses grease will grind and fail. When buying, look for a sealed design, a smooth rotation feel, and a bearing that matches the mount's seat geometry — do not assume all bearings are interchangeable.
Sealed vs. open bearings
Sealed bearings have rubber or metal seals that keep grease in and contaminants out. Open bearings rely on grease packing and are more susceptible to failure.
Grease retention and contamination
Contamination is the leading cause of bearing failure. A sealed bearing with high-quality grease will last longer.
What to look for when buying replacement bearings
Choose a sealed bearing from a reputable brand. Ensure it matches the mount's seat geometry and has a smooth rotation feel. Avoid unbranded bearings with no seal.
FAQ
Can I replace just the bearing without the mount?
Yes, if the bearing is serviceable separately and the mount rubber is intact. If the rubber is cracked, separated, or the plate has vertical play, replace both — the labor is the same and the second failure is predictable.
How long do strut mount bearings last?
Typically 50,000 to 100,000 miles, depending on road conditions and driving habits.
Can a bad bearing cause uneven tire wear?
Yes. A failed bearing can cause tire cupping and uneven wear due to changes in alignment geometry.
Do I need an alignment after replacing the bearing?
Yes. Alignment is required because the mount position affects camber and caster.
---
Related