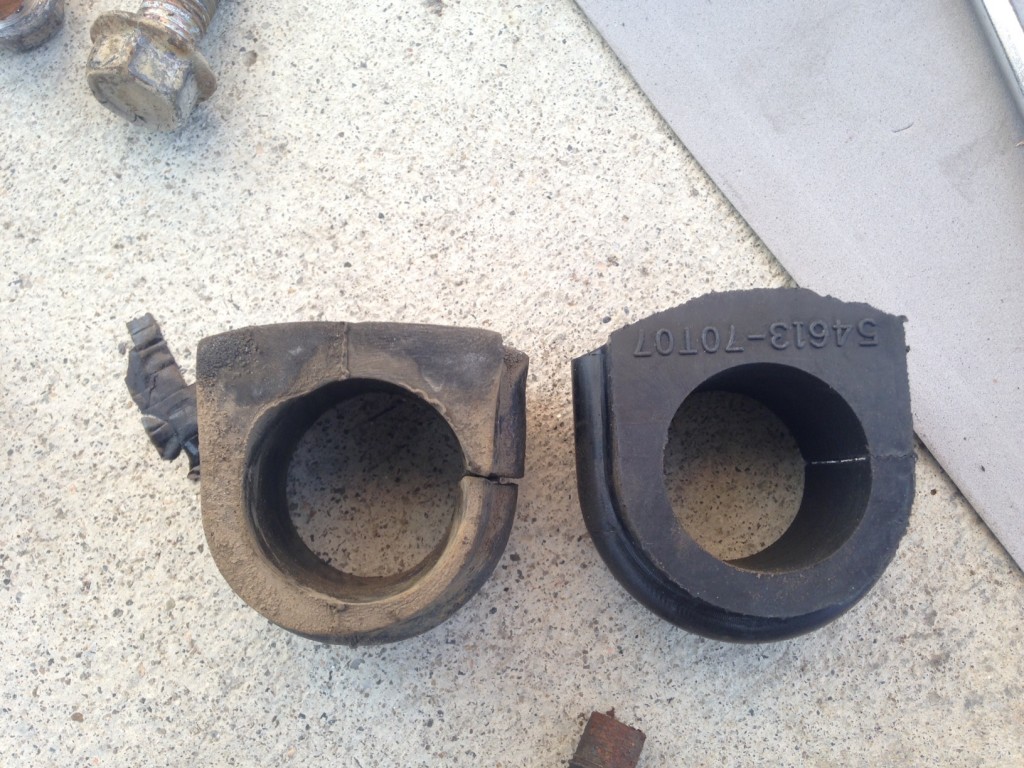
Stabilizer Bar Bushing Replacement: Confirm the Noise Source First
Stabilizer bar bushings should only be replaced after you have confirmed they are the source of the clunk or handling change — and in most cases, a worn end link is the more common culprit. As a technician who has replaced hundreds of sway bar bushings, I can tell you the most expensive mistake is buying parts before isolating the noise. Stabilizer bar bushings (also called sway bar bushings) secure the bar to the subframe or chassis. When the rubber or polyurethane degrades, the bar shifts under load and produces a dull knock over bumps or during steering input. End links, control arm bushings, and strut mounts produce similar noises, and replacing the wrong part wastes both money and a Saturday.
This guide gives you a diagnostic-first framework: confirm the bushing is the problem, choose the right material for your driving, and install it correctly with the right torque. That sequence — diagnose, select, install — is what separates a lasting repair from a comeback.
Diagnostic Framework: Is It the Bushing, the End Link, or Something Else?
Work through these steps in order. Do not skip to parts until you have a confirmed diagnosis.
Step 1 — Dry park test. With the vehicle on ramps on level ground, have a helper rock the steering wheel back and forth about 30–45 degrees while you listen and watch near the sway bar brackets. A worn stabilizer bar bushing typically produces a lower-frequency clunk directly at the bracket. A worn end link clicks or rattles at the bar ends where the link attaches to the control arm or strut. The location and character of the noise are your first filter.
Step 2 — Pry bar check. Use a pry bar between the bar and the bracket to check for excessive bushing movement. Compare the suspect side to the opposite side. If one bushing allows noticeably more deflection, it is a candidate for replacement. Visible cracks, deformation, or missing chunks of rubber confirm the diagnosis. A side-by-side comparison of a worn, cracked bushing next to a new one makes this obvious. [MODEL_GENERATION: An annotated diagram showing pry bar placement between the bar and bracket, with arrows indicating the direction of force and the gap to measure, would clarify this step for first-time DIYers.]
Step 3 — End link inspection. Before committing to bushings, grab each end link and shake it. Torn boots, rusted studs, or perceptible play indicate the link is the actual noise source. Because end links are inexpensive and often fail before bushings, many technicians replace both at the same time — but only after confirming which part is making noise.
Step 4 — Rule out other components. If the noise persists after the dry park test and pry bar check, inspect control arm bushings and strut mounts. These produce similar clunks and are not addressed by a stabilizer bar bushing replacement.
Tools, Parts, and Safety: What You Need Before You Start
Basic hand tools and a replacement bushing kit are usually all this job requires, which makes it a reasonable DIY candidate — but only if you have safe lifting equipment. Essential tools: a metric socket set (commonly 10–19 mm depending on the vehicle), a torque wrench, a pry bar, jack stands, ramps, and silicone grease if you are installing polyurethane bushings. A flat-lay of the tools and kit helps you confirm you have everything before the vehicle is in the air.
Parts to gather: new bushings (rubber or polyurethane), new brackets if the originals are corroded or bent, and new end links if inspection shows wear. Bracket corrosion is common on older vehicles in salt-belt regions; reusing a pitted bracket can prevent the new bushing from seating correctly.
Safety: never work under a vehicle supported only by a jack. Use jack stands on level, solid ground, and chock the wheels that remain on the ground. If you are using ramps for the dry park test, confirm they are rated for the vehicle's weight and positioned so the tires sit fully on the ramp surface.
Step-by-Step Replacement: From Jacking to Torque
Lift and support the vehicle, then remove the sway bar brackets and old bushings. Unbolt the bracket that holds the stabilizer bar bushing — note the orientation of the bracket and bushing before removal, because reinstalling them backward is a common cause of noise and misalignment. [MODEL_GENERATION: A photo of the bracket removal step, with the bracket bolts circled and the bushing orientation marked, would clarify which bolts to target and how the bushing sits inside the bracket.]
Clean the bar and bracket mating surfaces. Dirt, rust, and old grease prevent the new bushing from seating properly and can cause it to shift under load. Install the new bushings with the correct orientation — most bushings have a flat side or a locating feature that must face the bracket or the bar, depending on design.
Tighten bracket bolts to manufacturer torque specs. Typical bracket bolt torque falls in the 15–25 ft-lbs range, but this varies widely by vehicle — consult your factory service manual rather than guessing. [FACT_FROM_DATABASE: For a 2012–2017 Toyota Camry, the front stabilizer bar bracket bolts torque to 14 ft-lbs (19 Nm). Verify this against the factory service manual for your specific model year and trim.] Tighten with the suspension at ride height (on ramps or with a jack under the control arm) to avoid twisting the bushing, which preloads the rubber and shortens its life.
Reinstall end links and torque to spec. If you are replacing end links, tighten them with the suspension loaded as well. End link nuts that are tightened with the suspension hanging can bind the link's ball joint and cause premature failure.
Rubber vs. Polyurethane: Choose Based on How You Drive
Rubber is the right choice for daily driving and comfort. OEM-style rubber bushings are quiet, absorb vibration, and require no periodic greasing. They are also the least expensive option, typically $10–$30 per pair. If your priority is a factory-like ride and you do not track the car, rubber is the correct answer.
Polyurethane is stiffer, improves handling response, and lasts longer under hard use — but it transmits more noise and requires periodic greasing. Poly bushings typically run $20–$50 per pair and are available in different durometers. A softer poly (around 70A) is suitable for street use, while a harder compound (around 90A) is intended for track or competition use. A side-by-side comparison of a rubber bushing and a polyurethane bushing makes the material and design differences clear.
Consider your driving conditions before choosing. If you drive on rough roads, rubber's compliance is an advantage. If you autocross or track the car, poly's reduced deflection keeps the bar working more consistently. For a street car that sees occasional spirited driving, a soft poly is a reasonable middle ground — but expect to grease it periodically. Avoid poly on a daily driver if noise is a concern; the stiffer material transmits more road noise and vibration into the cabin, which many drivers find objectionable on a commute.
Torque Specs and Tightening Under Load: Why It Matters
Always consult the factory service manual for your specific vehicle — torque specs vary widely, and guessing can crush the bushing or leave it loose. Typical bracket bolt torque ranges from 15–25 ft-lbs, but this is a range, not a universal spec. Over-tightening can crush the bushing and distort the bracket; under-tightening allows the bar to move and produces the same clunk you were trying to fix.
Tighten with the suspension at ride height. This is critical. If you tighten the bracket bolts with the suspension hanging, the bushing is twisted at rest and will fail prematurely. This is one of the most common mistakes DIYers make — and it is entirely preventable. Use ramps or place a jack under the control arm to bring the suspension to its normal loaded position before final torque.
The same principle applies to end links. Tighten end link nuts with the suspension loaded so the ball joint sits at its natural angle. If you are unsure of the correct torque for your vehicle, a service manual or a reputable repair database is the only reliable source — do not rely on generic internet specs.
When to Replace End Links and How to Inspect Them
Inspect end links for torn boots, excessive play, or corrosion — if any are present, replace them. End links are inexpensive ($20–$60 per pair) and are often the actual source of clunking, so replacing them alongside the bushings is a common and sensible practice. Grab the link and try to move it; perceptible play or a grinding feel indicates the ball joint is worn.
If the end links are worn, replace them — do not try to re-grease a sealed link or reuse a link with a torn boot. Tighten end link nuts to manufacturer specs with the suspension loaded. If you are replacing both bushings and end links, do the bushings first, then the links, so you are not fighting the bar while trying to seat the bushings.
Cost Breakdown: DIY vs. Shop, OEM vs. Aftermarket
Parts cost is modest: rubber bushings run $10–$30 per pair, polyurethane $20–$50 per pair, and end links $20–$60 per pair. OEM bushings typically cost more than aftermarket but offer known fit and material consistency. Aftermarket poly bushings are often the better value for performance use, but verify the durometer and included hardware before buying.
Labor is 1–2 hours for a typical stabilizer bar bushing replacement. At shop rates of $80–$150 per hour, that is $80–$300 in labor. DIY savings therefore range from roughly $100–$300, assuming you already own the tools. If you need to buy a torque wrench and jack stands, factor that into the decision — but those tools pay for themselves over multiple jobs. Value your time: if the job takes you two hours and you bill your own time at $50 per hour, the effective savings shrink. For many DIYers, the satisfaction and learning are part of the return.
Alignment effects: a stabilizer bar bushing replacement does not change alignment geometry, but if you disturb the control arm or strut during the job, an alignment check is prudent. Budget $80–$150 for an alignment if you are unsure. For wholesale buyers evaluating bushing material options, the decision framework is: rubber for OEM replacement and comfort-focused resale, polyurethane for performance-oriented customers who understand the trade-offs. Stock both if your customer base spans daily drivers and enthusiasts.
Common Mistakes to Avoid for Long-Lasting Results
Over-greasing poly bushings. Excess grease attracts dirt and causes wear. Use only the supplied grease and apply a thin coat — more is not better.
Incorrect bracket orientation. Reinstalling the bracket backward or the bushing upside down causes misalignment and noise. Photograph the assembly before disassembly if you are unsure.
Reusing worn hardware. Bolts and nuts that are corroded or stretched can loosen. Replace corroded fasteners.
Ignoring alignment effects. While a full alignment is not always needed after bushing replacement, a test drive is essential to confirm the fix. If the clunk persists, re-check end links and control arm bushings — the stabilizer bar may not have been the source.
Maintenance and Long-Term Care
After replacement, re-torque bracket bolts after the first few hundred miles, especially with poly bushings that may settle. Inspect bushings at every oil change for cracks, deformation, or grease loss. Poly bushings should be re-greased periodically — frequency depends on driving conditions and the grease used. Rubber bushings require no maintenance beyond inspection.
If you notice the clunk returning, re-check the end links first. They are the most common source of repeat noise after a bushing job. A quick dry park test and pry bar check will tell you whether the bushing has shifted or the link has failed.
FAQs
How do I know if I need new brackets? Inspect the brackets for corrosion, bending, or elongation of the bolt holes. If the bracket is pitted or deformed, it will not hold the new bushing securely and should be replaced. Surface rust is acceptable; structural damage is not.
Can I drive with a broken sway bar bushing? Yes, but you should not ignore it. A missing or severely degraded bushing allows the bar to shift, which can cause handling instability, especially during emergency maneuvers. Replace it promptly.
What torque should I use for sway bar bracket bolts? Consult your factory service manual. A typical range is 15–25 ft-lbs, but this varies by vehicle. For a 2012–2017 Toyota Camry, the front stabilizer bar bracket bolts torque to 14 ft-lbs (19 Nm). [FACT_FROM_DATABASE]
---
Related