Control Arm Replacement: When to Choose OEM vs Aftermarket
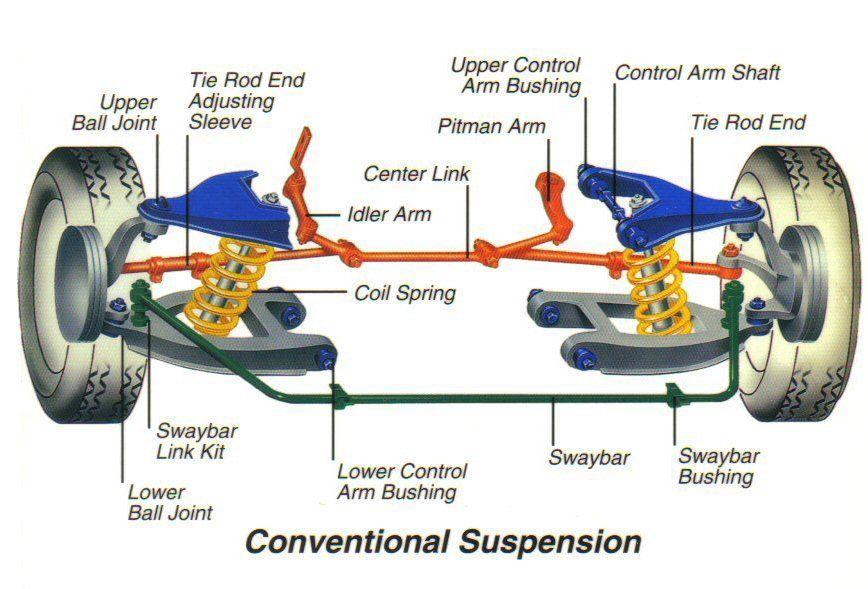
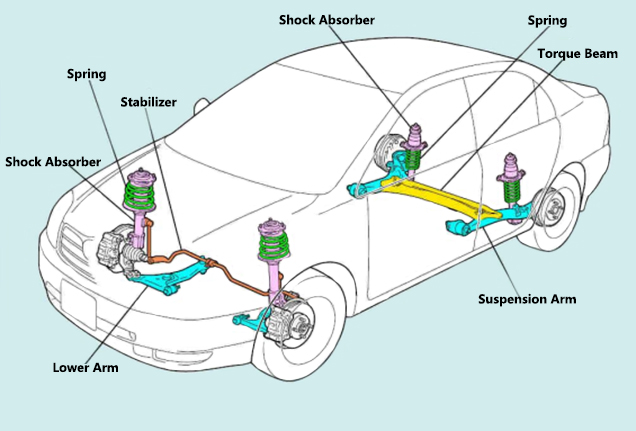
Control arms are the pivot points connecting your vehicle's wheels to the frame, managing suspension geometry and alignment. When they wear, you'll notice clunking noises over bumps, uneven tire wear, or a wandering steering wheel. Replacing them is inevitable, but the choice between OEM and aftermarket isn't always clear-cut.
OEM (Original Equipment Manufacturer) parts are made by the same suppliers that produce for automakers, matching factory specs exactly. Aftermarket parts come from third-party manufacturers, ranging from budget knock-offs to premium performance upgrades. The right choice depends on your vehicle's use, your budget, and how much NVH (noise, vibration, harshness) you're willing to tolerate.
Quick decision guide:
- Stock replacement: Stick with OEM or a high-quality aftermarket brand like Moog or Mevotech that uses rubber bushings.
- Lifted truck (2+ inches): Aftermarket upper control arms with adjustable ball joints are often necessary to correct alignment angles.
- Performance build: Aftermarket arms with polyurethane or spherical bushings reduce deflection and improve precision, but expect more NVH.
Cost Comparison: Real Price Examples for OEM vs Aftermarket Control Arms
Price is a major factor. Here are real-world ranges for popular vehicles (per arm, including ball joint if applicable):
- Ford F-150 (2015-2020): OEM lower control arms run $180–$300; aftermarket budget brands $60–$120, premium (Moog, Mevotech) $120–$250.
- Toyota Tacoma (2016-2021): OEM upper arms $200–$350; aftermarket $80–$200 (budget) to $250–$450 (premium adjustable).
- Honda Civic (2016-2020): OEM lower arms $150–$250; aftermarket $50–$150 (budget) to $100–$200 (premium).
Factors that affect price:
- Material: Steel is cheaper but heavier; aluminum is lighter and more expensive.
- Bushing type: Rubber is cheapest; polyurethane and spherical cost more.
- Adjustability: Adjustable arms (for camber/caster) are pricier but essential for lifted trucks.
- Included components: Many aftermarket arms come with new ball joints and bushings pre-installed, while OEM may require separate purchases.
NVH Differences: How Bushing Material Affects Ride Comfort and Noise
Bushings are the rubber or polyurethane isolators between the control arm and frame. They absorb road shock and allow controlled movement. The material drastically changes NVH:
- Rubber: OEM standard. Excellent noise isolation, comfortable ride, but can flex under load, reducing precision. Wears out over time (cracks, tears).
- Polyurethane: Stiffer than rubber, reduces suspension flex, improves handling response. However, transmits more road noise and vibration into the cabin. Can squeak if not lubricated properly.
- Spherical (Heim joint): A metal bearing that allows maximum articulation and zero deflection. Ideal for off-road or track use, but extremely harsh for daily driving—you'll feel every pebble. Noisy, but precise alignment.
Real-world example: A 2018 Silverado with polyurethane bushings will have noticeably more road hum at highway speeds compared to OEM rubber. For a daily driver, stick with rubber; for a weekend track car, polyurethane or spherical may be acceptable trade-offs.
Use-Case Recommendations: Lifted Trucks, Performance Builds, and Stock Replacements
Lifted Trucks (2+ inches): When you lift a truck, the stock upper control arms often can't provide enough camber adjustment, leading to premature tire wear. Aftermarket upper arms with adjustable ball joints (e.g., from brands like Cognito or Dirt King) allow proper alignment. For a 3-inch lift on a 2019 F-150, you'll need these to get camber back within spec. Cheap aftermarket arms may have poor tolerances and fail prematurely—stick with reputable brands.
Performance Builds: Aftermarket arms with polyurethane or spherical bushings reduce deflection under hard cornering, keeping geometry stable. For a track-focused Civic, a set of Hardrace or Whiteline arms with spherical bearings will sharpen turn-in but increase NVH. If it's a street car, consider polyurethane for a balance.
Stock Replacements: For a daily driver with no modifications, OEM or high-quality aftermarket (e.g., Moog Problem Solver) with rubber bushings will maintain factory ride quality. Moog's arms often include upgraded ball joints and grease fittings, extending service life.
Warranty Considerations: OEM vs Aftermarket Coverage
OEM parts typically come with a 12-month/12,000-mile warranty (or longer on new vehicles). Aftermarket warranties vary:
- Moog, Mevotech: Limited lifetime warranty (covers parts, not labor).
- Dorman: Limited lifetime on many parts.
- Budget brands: Often only 1-year warranty.
Check if the warranty covers labor—most don't. Keep receipts and understand terms. Some aftermarket warranties require professional installation; DIY installs may void coverage. For example, Mevotech's warranty requires proof of installation by a certified mechanic.
How to Identify Quality Aftermarket Brands and Avoid Cheap Imitations
Not all aftermarket arms are created equal. Here's how to spot quality:
- Brand reputation: Stick with known names: Moog, Mevotech, Dorman, AC Delco, or specialized brands like Cognito, Dirt King, or Hardrace.
- Certifications: Look for ISO/TS 16949 or IATF 16949 (automotive quality standards).
- Build quality: Inspect welds (should be clean and consistent), finish (powder coat vs. cheap paint), and bushing material (rubber should be dense, not spongy).
- Reviews: Check forums and retailer reviews for real-world feedback. A part with 4.5 stars from 500 buyers is safer than a no-name with 10 reviews.
- Price: If it's suspiciously cheap, it's likely using inferior steel or poor bushings. A $40 control arm for an F-150 is a red flag.
- Fitment: Ensure the part is designed for your exact vehicle and lift height. Some arms are only for stock height.
Step-by-Step Installation Guide with Torque Specifications
Replacing control arms is a DIY-friendly job if you have basic tools and a weekend. Here's a general guide—always verify torque specs for your specific vehicle.
Tools needed: Jack, jack stands, lug wrench, socket set, torque wrench, penetrating oil, and a ball joint separator (if needed).
Step 1: Safely lift the vehicle and support it on jack stands. Never work under a car supported only by a jack.
Step 2: Remove the wheel and tire.
Step 3: Disconnect the sway bar link and, if necessary, the ball joint from the steering knuckle. Use penetrating oil on rusty bolts.
Step 4: Remove the control arm bolts. Note: some are camber bolts—mark their position before removal to aid alignment.
Step 5: Install the new control arm, hand-tighten the bolts, then torque to spec. Here are common specs:
- 2015-2020 Ford F-150: Lower control arm bolts: 148 ft-lbs; upper: 111 ft-lbs.
- 2016-2021 Toyota Tacoma: Lower: 129 ft-lbs; upper: 94 ft-lbs.
- 2016-2020 Honda Civic: Lower: 80 ft-lbs; upper: 50 ft-lbs.
Step 6: Reconnect the ball joint and sway bar link. Torque to spec.
Step 7: Install the wheel and lower the vehicle.
Step 8: Get a wheel alignment—mandatory after control arm replacement. Even if you marked camber bolts, alignment will be off.
Warning: Torque specs vary by year and model. Always consult a reliable source like a factory service manual or reputable online database.