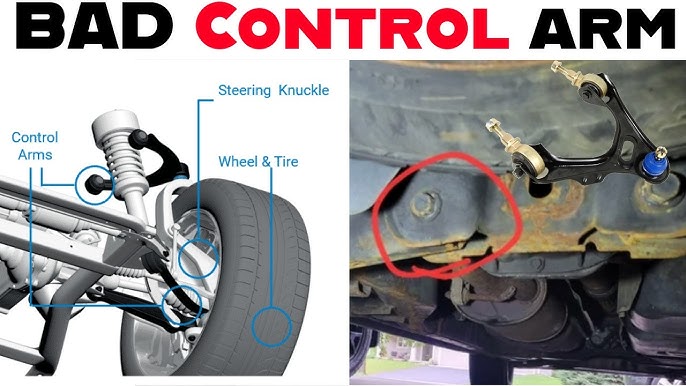
Ranked Symptoms: What a Bad Control Arm Sounds and Feels Like
A heavy metallic clunking or knocking over sharp bumps and potholes—especially when turning or hitting bumps at an angle—usually points to a worn ball joint. The ball joint stud moves inside a worn socket, producing a sharp metal-on-metal impact as the suspension loads and unloads.
A dull thud, rattling, or loose feeling over washboard surfaces typically indicates a torn or degraded control arm bushing. The rubber bushing loses its ability to isolate vibration, so the control arm moves against the subframe and transmits a lower-frequency thud.
Steering wander, increased braking pull, or vague on-center feel usually comes from bushing compliance loss. Worn bushings allow the control arm to shift under braking and cornering loads, changing alignment angles dynamically. Vibration at highway speeds can be from ball joint looseness or bushing damage—both create uncontrolled wheel movement.
Uneven tire wear (cupping, feathering) and visible steering wheel shimmy under braking are secondary signs that require physical confirmation. These symptoms appear after the bushing or ball joint has already failed enough to alter suspension geometry, so use them as triggers for inspection rather than standalone diagnosis.
Safety and Tools: Preparing for a Control Arm Inspection
Required tools: jack, jack stands rated for the vehicle weight, wheel chocks, lug wrench, pry bar (18–24 inches), flashlight, gloves, safety glasses, and a breaker bar if the lug nuts are over-tightened.
Safety protocol: park on level ground, chock the rear wheels, loosen the lug nuts before lifting, and place jack stands at the designated lift points under the vehicle. Never rely on a hydraulic jack alone—the suspension must be supported while you apply prying force.
Remove the front wheel on the side being inspected. This gives direct access to the control arm, bushings, and ball joint. Keep the wheel nearby to use for the loaded checks later if needed.
Step-by-Step Physical Inspection: Pry Bar Tests and Visual Checks
Ball joint vertical play test: with the vehicle on jack stands and the suspension hanging, place a pry bar under the tire (or under the lower control arm near the ball joint) and lift upward firmly. Watch and feel for movement at the ball joint stud as the control arm moves. Also grasp the tire at 12 and 6 o'clock and rock it in and out. Any perceptible play at the ball joint indicates failure.
Bushing inspection: use a flashlight to look for cracked, torn, or oil-leaking rubber bushings where the control arm mounts to the subframe. Insert a pry bar between the control arm and the subframe near the bushing and pry sideways and vertically. Compare movement to the opposite side—excessive deflection beyond normal compliance indicates a failed bushing.
Check the control arm itself for cracks, bends, or rust perforation, especially at the ball joint mounting area and bushing sleeves. A bent arm changes suspension geometry and will not hold alignment.
Note whether the suspension is loaded or unloaded. Some play only appears under load, so repeat checks with the tire back on and the vehicle weight on the suspension. Have a helper turn the steering wheel while you watch the ball joint and bushings for movement.
Interpreting Your Findings: Is It the Ball Joint, Bushing, or the Whole Arm?
If the 12/6 rock or pry bar lift produces movement at the ball joint stud but the bushing is firm and intact, the ball joint is the likely failure.
If the pry bar between the control arm and subframe causes excessive lateral or vertical deflection at the bushing while the ball joint feels tight, the bushing is worn.
If both ball joint and bushing fail tests, or the control arm shows structural damage (bent, cracked, heavily rusted), the entire control arm assembly should be considered.
Consider vehicle age and mileage. On high-mileage vehicles with original components, replacing the entire assembly may be more cost-effective than pressing in separate bushings or ball joints, especially if one side already shows significant wear—the other side is often close behind.
Repair Decision Framework: Bushing Only, Ball Joint Only, or Full Control Arm Assembly
Replace only the bushing if the ball joint is serviceable (bolted-in or press-in with available tooling), the arm is structurally sound, and the bushing is the sole failure.
Replace only the ball joint if it is a bolt-in design with a known-good control arm and bushing. Be aware that many OEM ball joints are integrated into the control arm and require the whole arm.
Replace the entire control arm assembly when the ball joint is integral (non-serviceable), the bushing is torn, or the arm shows any damage. This often saves labor and ensures both wear points are new.
On vehicles with over 100,000 miles on original control arms, replacing both sides simultaneously is often recommended. It maintains balanced handling and avoids a second alignment and second labor charge.
Cost and Quality: DIY vs Professional Replacement and OEM vs Aftermarket
DIY replacement requires a torque wrench, ball joint separator, and often a press for bushings. Factor in the cost of a wheel alignment after installation—it is not optional.
Professional replacement typically includes labor and may include alignment, but verify before agreeing. Shops have the correct tools and torque specs, and their labor warranty covers installation errors.
OEM vs aftermarket: evaluate material quality (forged vs stamped steel or aluminum), bushing type (rubber vs polyurethane), ball joint boot material, and warranty length. Reputable aftermarket brands can match or exceed OEM if they meet ISO/TS quality standards. For reliable [automotive suspension components](/products), check that the manufacturer follows strict [quality control](/quality) procedures and tests for corrosion resistance and dimensional accuracy.
Avoid choosing the cheapest option if it lacks a warranty, uses thin stamped steel, or has no corrosion protection. These often fail prematurely and cost more in the long run due to repeat labor and alignment.
Cost-benefit: DIY saves labor but requires time and tools. Professional ensures correct torque and warranty on labor. Always get an alignment after replacement regardless of who installs it.
Safety Risks, Alignment, and Torque Specifications After Replacement
Driving with a severely worn control arm risks sudden loss of steering control, uneven braking, and accelerated tire wear. A ball joint separation can cause the wheel to fold under the vehicle, leading to a crash.
After replacing any control arm component, a wheel alignment is mandatory because suspension geometry changes. Skipping it causes rapid tire wear and poor handling.
Torque specifications for control arm bolts and ball joint nuts are critical: under-torquing allows movement and wear, over-torquing can strip threads or deform bushings. Find OE torque specs in the vehicle service manual, on the manufacturer's technical portal, or from a reputable online database like ALLDATA or Mitchell1.
Always torque bolts with the suspension at normal ride height (loaded) where specified. Use new fasteners if the old ones are torque-to-yield or show corrosion.