
Front Subframe Symptoms, Diagnosis & Replacement: A Decision Guide
A dull, heavy clunk over sharp bumps that you feel through the floor and steering wheel points to the subframe; a sharp, corner-localized rattle points to control arms or sway bar links. That distinction is the difference between a stabilizer link job and a full subframe replacement, so get it right before ordering parts.
This guide is built around one decision: is the subframe itself structurally compromised? Not "is there a noise." The answer hinges on damage type—corrosion versus impact—and vehicle-specific failure patterns, not mileage or how loud the clunk is. Work through the symptom map, run the pry-bar and visual checks, then use the repair/replace matrix to commit to a path.
Symptom-to-Cause Map: Is It the Subframe or Something Else?
Use this list before you put the car on a lift. Match the symptom to the likely source, then run the listed test to confirm.
- Dull, heavy thud over sharp bumps, felt in seat and floor pan — likely subframe bushing failure (cradle shifting against body). Confirm with a pry bar between subframe and body at each mount; look for independent shift and torn rubber separated from the metal sleeve.
- Sharp, corner-localized rattle over small pavement imperfections; disappears on smooth roads — likely sway bar links. Confirm by grabbing the link and rocking it; listen for rapid rattle that changes with one-wheel bumps.
- Sharper, directional clunk that changes with braking, acceleration, and one-wheel bumps — likely control arm bushings. Confirm by loading the arm with a pry bar; check for fore-aft and vertical play at the bushing.
- Knock felt directly in the steering wheel with play or wander—not a body-level clunk — likely the steering rack. Confirm by rocking the wheel with the engine off; isolate play to the rack, not the cradle.
- Creak or pop during steering input or driveway transitions — likely a cracked weld or corroded mounting point flexing under load. Confirm with visual inspection of welds and mounts; probe suspect metal with a pick.
- Steering wheel center position shifts after a hard bump — likely subframe movement, not alignment alone. Confirm with an alignment rack reading; compare camber, caster, and toe side-to-side.
If the symptom lands in the subframe row, continue. If it lands elsewhere, fix that component first—replacing a subframe for a sway bar link noise is an expensive misdiagnosis.
Diagnostic Decision Flow: Visual Inspection, Pry-Bar Checks, and When You Need a Lift
Start with a visual inspection on a lift or with the front end safely raised. Surface rust is normal; flaking metal, perforation, or visible cracks around welds and mounting points indicate structural compromise and require replacement.
Visual Inspection and Pry-Bar Test
A pry bar test on the subframe bushings reveals excessive movement. Place the bar between the subframe and the body at each mounting point and apply moderate force. If the subframe shifts independently of the body, the bushings or mounting points are suspect. Compare deflection side-to-side; significant play on one side points to a failed bushing or a corroded mount.
Probe suspect metal with a pick or screwdriver. If the metal gives way or flakes off in layers, the subframe is done—stop the diagnosis and move to replacement.
When a Lift or Alignment Rack Is Mandatory
An alignment rack or lift is mandatory when steering drift or uneven tire wear is present. These symptoms often accompany subframe misalignment or deformation, and you cannot diagnose them accurately with the vehicle on the ground. If the subframe has shifted, an alignment reading will show camber, caster, or toe values outside spec on one or both sides.
Vehicle-Specific Failure Patterns
Failure patterns vary by model, and knowing the common weak points saves diagnostic time. The patterns below are general model-family tendencies, not TSB citations—verify against the factory service manual for your specific year and platform.
Fiat 500. Front subframes are known for corrosion-related failures, particularly in regions with road salt. The structural weakness typically develops around the mounting points, and the corrosion often progresses from the inside out, making it easy to underestimate during a quick visual check. Inspect the mount areas closely rather than relying on a general underbody look.
Ford Explorer. Subframes on certain generations may develop cracks near the steering rack mounts or control arm brackets. Heavy use, impact damage, or a history of pothole strikes exacerbates this pattern. Inspect these areas specifically.
BMW (E46, E90). These platforms can suffer from subframe cracking around the rear mounting points, but front subframe issues are less common. When they occur, they are usually linked to impact damage or high-mileage bushing degradation rather than a design weakness.
Repair or Replace? A Damage-Type Decision Matrix
The decision hinges on damage type, not mileage. Use this matrix to commit to a path.
| Damage type | Action | Rationale |
|---|---|---|
| Surface rust only, structure sound | Treat and monitor | No structural compromise; recheck at next service |
| Structural corrosion—perforation, flaking, reduced thickness | Replace subframe | Cannot be safely repaired; load path is compromised |
| Impact deformation—bent mounting points or cracked subframe | Replace subframe | Replacement is the only safe path |
| Bushing degradation only, structure sound | Replace bushings | Cost-effective; subframe does not need replacement |
Rust and Corrosion Assessment
Surface rust may be treatable; perforation or flaking metal typically condemns the subframe. When in doubt, have a professional assess structural integrity. Use a pick or screwdriver to probe suspect areas—if the metal gives way or flakes off in layers, the subframe is done.
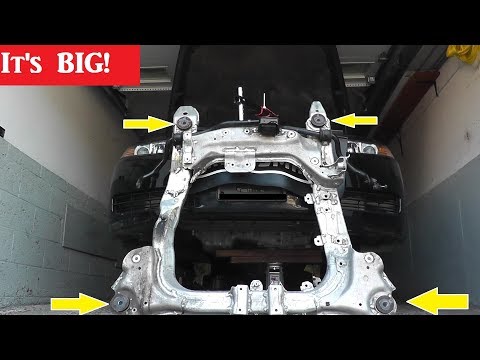
If the subframe passes the structural check but the bushings are worn, replacement bushings are the cost-effective path. For Hyundai and Kia applications, options like the Front subframe — 62400-A7100 exist as complete assemblies, while individual bushings such as the Large suspension bushing — 54584-2D000 and Small suspension bushing — 54551-F9000 allow a targeted repair.
Aftermarket vs. OEM Subframe Selection: What Actually Matters
Material thickness and steel grade affect structural rigidity, and aftermarket subframes should match OEM specifications for these dimensions. A subframe that is thinner or made from a lower-grade steel will flex more under load, which accelerates bushing wear and can affect alignment stability.
Corrosion protection is critical, especially for vehicles in salt-belt regions. E-coat and galvanizing are the common approaches; aftermarket options may vary in coating quality. If you live where roads are salted, prioritize coating quality over a small price difference.
Pre-installed bushings can save labor time and ensure proper fit, but verify they are of comparable quality to OEM. Alignment provision—slotted holes or adjustable mounting points—should match OEM to allow proper alignment after installation.
Cost Breakdown by Vehicle Class
Total job cost varies widely by region, labor rate, vehicle class, and whether you use OEM or aftermarket parts. As a rule of thumb, compact cars are the least expensive (smaller, lighter subframes and shorter labor times), mid-size cars sit in the middle, and SUVs and trucks cost the most (larger subframes, longer labor times, more fasteners). Always budget for these line items:
- Replacement subframe (OEM or aftermarket)
- Labor hours for removal and installation
- Wheel alignment after installation
- Replacement fasteners (bolts, nuts) — corroded or stretched hardware is common on older vehicles
If bushings are integrated into the control arms on your platform, factor in the cost of new arms as well. Get an itemized quote before authorizing the job.
Safety and Tool Requirements
Use manufacturer-specified lift points and support stands rated for the vehicle's weight. Never rely on a single jack. The subframe carries the engine and suspension loads, and a sudden shift during removal can cause serious injury.
Safety Checklist Before You Start
- Disconnect the battery if the subframe carries engine mounts or if steering components are being disturbed.
- Support the engine separately if the subframe carries engine mounts—do not let it hang on the mounts alone.
- Support the subframe with a jack before removing the final mounting bolts. Never rely on the bolts alone to hold it in place.
- Work in a sequence that keeps the subframe balanced, and lower it slowly once all fasteners are free.
- Torque specs must come from the vehicle's factory service manual. Using generic values can lead to fastener failure or subframe shift. If you do not have the manual, stop and get it—this is not a job for guessed torque.
Post-Replacement Alignment Is Non-Negotiable
Subframe installation affects camber, caster, and toe, and driving without alignment can cause rapid tire wear and unpredictable handling. Budget for it as part of the job, not as an optional extra.
FAQ
Can I drive with a bad subframe? Use this severity scale:
- Green (monitor): Surface rust only, structure sound. Drive normally; recheck at next service.
- Yellow (repair soon): Worn bushings with sound structure. Drive cautiously to a shop; expect worsening noise and handling.
- Red (stop driving): Cracked, corroded-through, or visibly shifted subframe. Do not drive. A cracked subframe risks catastrophic failure and loss of control.
How long does a subframe replacement take? Compact cars typically 4–6 hours, mid-size 6–8 hours, SUVs 8–10 hours, assuming no seized fasteners. Corroded bolts can add significant time.
Do I need an alignment after subframe replacement? Yes. The subframe locates the control arms and steering rack; any shift changes camber, caster, and toe.
Can I replace just the bushings? Yes, if the subframe structure is sound. Pressing out old bushings and installing new ones is far cheaper than a full subframe replacement.