Double Wishbone Suspension: Diagnose the Worn Part Before You Replace It
A clunk over bumps, uneven tire wear, or steering wander on a double wishbone suspension does not tell you which component failed — and it does not tell you whether to replace a $20 bushing or a $200 control arm. The fix depends on which part has play, not on mileage or noise alone. This guide walks through the inspection logic that isolates the worn component, then matches the repair to the vehicle's actual use case.
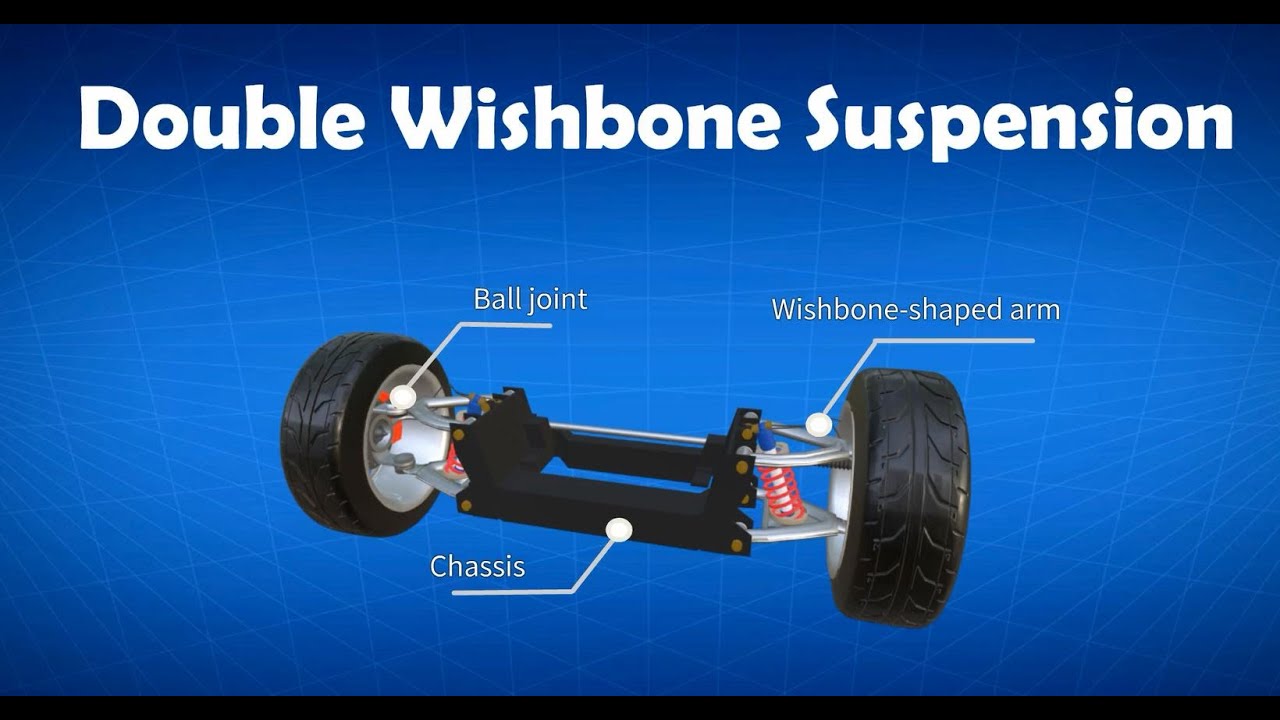
Double wishbone suspension uses upper and lower control arms (A-arms) connected to the upright via ball joints, with bushings at the chassis pivot points. This layout allows independent wheel movement and camber control. The geometry — arm lengths, pivot locations, and ball joint angles — determines camber change during compression and rebound. Worn components alter this geometry, causing uneven tire wear and handling changes.
Component Breakdown: What Fails and How
The system has five wearable or damage-prone parts, each with distinct failure modes:
- Upper and lower ball joints — pivot points between the control arms and the upright. They carry vertical and lateral loads and are typically the first to show play. A joint with vertical play lets the upright move independently of the arm, changing camber under load.
- Control arm bushings — isolate the arm from the chassis and allow rotation. They degrade with heat, ozone, and mileage. A separated bushing lets the arm shift fore-aft, changing caster and toe.
- Upper and lower control arms — can bend in a collision or develop elongated mounting holes. A bent arm changes geometry and cannot be fixed by replacing bushings alone.
- The upright (knuckle) — rarely fails unless collision damage is present, but it is the reference point for all geometry measurements.
These are not just comfort issues. A ball joint with play or a collapsed bushing accelerates tire wear and can make the vehicle unpredictable in emergency maneuvers. The diagnostic goal is to isolate which component has play — not to replace everything.
Symptoms That Point to Worn Double Wishbone Parts (and What They Don't Tell You)
Symptoms narrow the suspect list. They do not confirm a diagnosis.
- Clunking over bumps — often a ball joint with vertical play or a bushing with separated rubber. But a clunk at low speed over bumps could also be a sway bar link. Without a physical test, you are guessing.
- Uneven tire wear — typically inner or outer edge wear on the front tires — indicates camber or toe has changed. That can come from a bent arm, a collapsed bushing, or a worn ball joint.
- Steering wander or a vague on-center feel — suggests the front toe is changing dynamically, usually from worn control arm bushings or a ball joint with lateral play.
Mileage alone is not a reliable replacement trigger. The same noise can come from a $20 bushing or a $200 control arm, and the cost difference between replacing a bushing and replacing a complete control arm assembly is significant. Symptom-only diagnosis leads to parts-swapping. The physical test is not optional.
Step-by-Step Diagnostic Logic: Testing Ball Joints, Bushings, and Control Arms
Ball joint test
Raise the vehicle and grab the tire at top and bottom. Rock it. If there is play, inspect the ball joint for vertical or lateral movement. For a more precise test, use a pry bar under the tire while watching the ball joint — any vertical movement between the joint and the knuckle indicates wear. A ball joint with a torn boot has lost its grease and will fail soon even if play is not yet detectable. A ball joint with play or a broken boot is a replace item.
Bushing test
Visually inspect control arm bushings for cracks, separation, or missing chunks. A bushing with surface cracks may still be functional. A bushing with deep cracks, missing rubber, or visible separation from the outer sleeve is a replace item. Pry the arm against the bushing — if the arm moves more than a few millimeters relative to the chassis, the bushing is worn.
Control arm test
Check for bent arms, elongated mounting holes, or collision damage. Compare the arm to a known-good part or use a straightedge. Elongated mounting holes allow the arm to shift under load, which changes alignment. A bent arm changes geometry and cannot be fixed by replacing bushings alone.
Decision gate
- Ball joint has play → replace the ball joint (or the control arm if the joint is integrated).
- Bushing is cracked but the arm is straight → replace the bushing.
- Arm is bent, or the ball joint is integrated and worn → replace the control arm assembly.
For Hyundai/Kia applications, control arms such as 54500-S1AA0 and 54500-CG000 are available as complete assemblies with bushings and ball joints pre-installed, which simplifies the repair when multiple components are worn. If only the bushing is worn, large suspension bushings like 54584-2D000 or 54584-3S100 can be pressed in separately.
OEM-Style Replacement vs Adjustable Upgrade: Matching the Part to the Vehicle's Use
OEM-style replacement restores factory alignment and ride quality. It is correct for daily drivers, stock-height vehicles, and repairs where the original geometry is adequate. Adjustable control arms and coilovers are appropriate when the vehicle is lowered, used for track or autocross, or when camber and toe need to be corrected beyond the factory adjustment range. They require alignment expertise and may increase NVH.
Decision criteria:
- Stock height, street use → OEM-style is the right call.
- Lowered or performance driving → adjustable arms may be necessary to correct geometry, but only if the worn part is being replaced anyway.
Cost consideration: adjustable parts typically cost more upfront and may require professional alignment. OEM-style parts are cheaper and simpler but will not solve geometry issues caused by a lowered ride height. For a daily-driven Hyundai/Kia at stock height, a control arm like 54500-2S000 or 54500-3X000 restores factory geometry and is the most cost-effective fix. For a lowered vehicle with excessive negative camber, adjustable arms allow correction, but the alignment technician must know how to set them.
Double Wishbone vs MacPherson Strut vs Multi-Link: What It Means for Repair and Parts Selection
Double wishbone uses separate control arms and ball joints, allowing camber control independent of the strut. MacPherson strut combines the damper and spring into a single unit with fewer pivots. Multi-link uses multiple links for finer geometry control.
Repair implication: double wishbone typically has more wearable joints — upper and lower ball joints, multiple bushings — than MacPherson strut, so diagnosis must isolate which joint is worn. Multi-link can have even more links, but the diagnostic logic is similar.
Parts selection: double wishbone components are often serviceable separately (ball joints, bushings), while some MacPherson strut designs require complete strut replacement. This affects cost and repair strategy. For example, a double wishbone front suspension on a Hyundai/Kia may have a lower control arm with a replaceable ball joint and separate bushings, allowing a targeted repair. A MacPherson strut design might require replacing the entire strut assembly if the upper mount or spring seat fails. Multi-link rear suspensions often have separate links that can be replaced individually, but the number of parts increases diagnostic time.
Prevention and Maintenance: What to Check Before Symptoms Escalate
Inspect ball joint boots for cracks or grease loss at every oil change or tire rotation. A torn boot leads to joint failure. Check control arm bushings for cracks, hardening, or separation during routine undercar inspections. Early replacement of a cheap bushing can prevent control arm damage.
A simple routine:
- Every 10,000 miles, grab each front tire at top and bottom and rock it. Any play indicates a ball joint or wheel bearing issue.
- Every 20,000 miles, inspect bushings with a pry bar.
- After any replacement, a professional alignment is required to reset camber and toe. Skipping alignment can cause rapid tire wear even with new parts.
- If you replace a control arm or bushing, tighten pivot bolts with the suspension at ride height to avoid preloading the bushings.
This prevents premature failure and maintains ride quality.
FAQ
Can I replace just the bushing instead of the whole control arm?
Yes, if the arm is straight and the ball joint is not integrated or worn. Large suspension bushings like 54584-2D000, 54584-3S100, or 54584-BU000 can be pressed in separately.
How do I know if my ball joint or bushing is causing the clunk?
You cannot know from the noise alone. A ball joint with vertical play and a separated bushing can both cause clunks and vague steering. Use the pry bar test on the ball joint and the bushing to isolate which component has play.
Do I need an alignment after replacing a control arm or bushing?
Yes. Any replacement that changes the position of the arm or upright requires a professional alignment to reset camber and toe. Skipping alignment can cause rapid tire wear even with new parts.
When should I upgrade to adjustable control arms instead of OEM-style?
When the vehicle is lowered or used for track/autocross, or when camber and toe need to be corrected beyond the factory adjustment range. Adjustable arms require alignment expertise and may increase NVH. For a stock-height daily driver, OEM-style is the right call.
---
Related