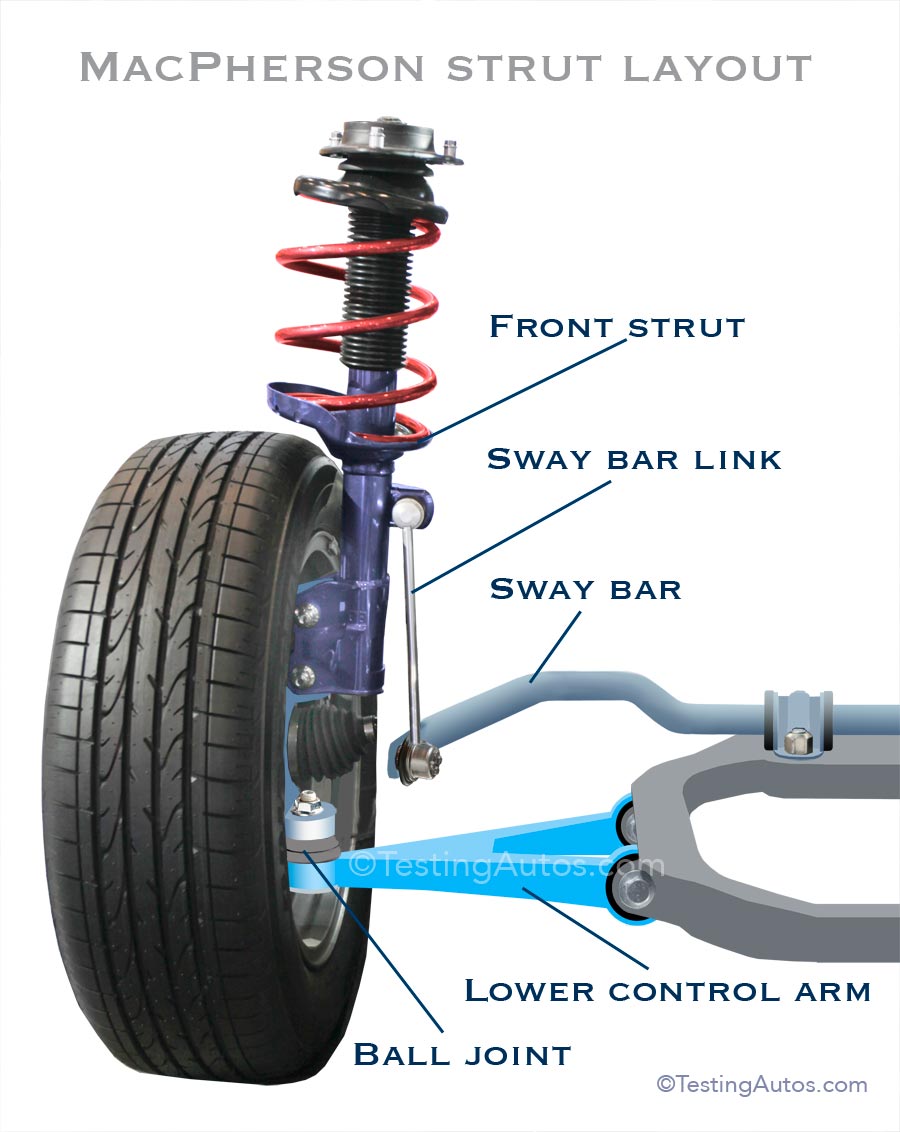
Control Arm Replacement: Diagnose the Failed Part, Then Choose Bare Arm vs. Loaded Assembly
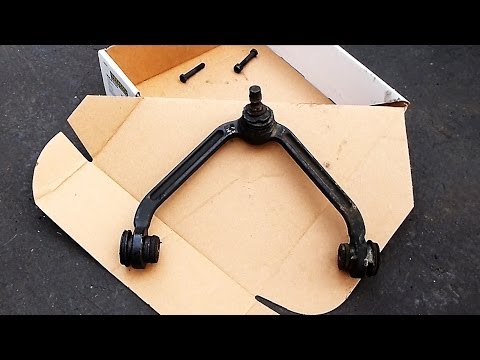
A clunk over bumps does not mean the control arm is bad. The failed part is often the ball joint or a bushing — and replacing the whole arm without confirming that is an expensive guess. The reliable way to isolate the failure is a physical inspection: a pry bar test on the ball joint, a visual check of bushing deformation, and a straightedge check for a bent arm. This is a recommended procedure based on industry practice, not a test performed by the author.
This guide is built around two decisions: which component actually failed, and whether to buy a bare arm or a loaded assembly. Torque, alignment, and re-torque steps follow.
Step 1: Isolate the Failed Component Before You Buy Anything
Symptom-to-component mapping narrows the suspect list before you lift the car:
- Clunk on turns — often a ball joint.
- Clunk on straight-ahead bumps — more often a bushing.
- Wandering and uneven tire wear — worn control arm bushings, a bent arm, or an alignment problem. The symptom alone does not confirm the arm is the failed part.
- Vibration at speed — rarely a control arm issue. It more often points to wheel balance, a bent wheel, or a worn tie rod end. Misdiagnosing vibration as a control arm problem wastes money.
Inspection sequence
- Chock the rear wheels, lift the front, and support on jack stands.
- Grab the tire at 12 and 6 o'clock and rock it — play suggests a ball joint or wheel bearing.
- Grab at 9 and 3 o'clock — play suggests a tie rod.
- Use a pry bar between the control arm and the subframe to check bushing movement. Excessive deflection or cracked rubber means the bushing is done.
- Run a straightedge along the arm to check for bends.
If the arm is straight and the ball joint and bushings are tight, the control arm is not your problem.
Step 2: Bare Arm or Loaded Assembly? Decide by Arm Design, Corrosion, and Labor
Arm design
- Riveted arm — ball joint and bushings permanently attached at the factory. Replacing the whole loaded assembly is the practical choice. Drilling out rivets and pressing in new components is labor-intensive and error-prone.
- Serviceable arm — bolted ball joint, press-fit bushings. Replacing only the failed component is viable when the arm itself is straight and uncorroded.
Corrosion
A corroded arm with seized bushings or a rusted ball joint housing often makes a loaded assembly cheaper than the labor to press out and press in individual components.
Labor economics
If the cost of pressing bushings and a ball joint approaches or exceeds the price difference between a bare arm and a loaded assembly, the loaded assembly is the better value — especially for a DIYer without a press.
Decision rule
- Riveted arm → loaded assembly.
- Serviceable arm, no corrosion, one failed component → replace that component.
- Serviceable arm, heavy corrosion or multiple failed components → loaded assembly.
- No press and no access to one → loaded assembly.
Step 3: How Urgent Is It? Safety Consequences of Driving on a Failing Control Arm
A control arm that has completely separated from its mounting point, or a ball joint that has pulled out of its socket, is a catastrophic failure risk — the wheel can collapse, causing loss of control. This is a park-it-now condition.
A worn bushing or a ball joint with slight play is a degradation risk. It will worsen over time and can cause uneven tire wear and poor handling, but it is not an immediate catastrophic failure in most cases.
Urgency is judged by inspection findings: visible cracks, severe corrosion, excessive ball joint play, or a bent arm indicate higher urgency than a slight clunk with no visible damage.
Mileage alone is never a valid reason to replace a control arm — no fixed interval exists, and inspection drives the decision.
- Separated arm or pulled ball joint — do not drive the car; tow it.
- Slight play — you can drive cautiously to a shop or your garage, but schedule the repair promptly.
Step 4: Removal and Installation
Safety first: jack stands are mandatory — never work under a car supported only by a jack. Chock the rear wheels and loosen lug nuts before lifting.
Tool list: ball joint separator or pickle fork, torque wrench, breaker bar, socket set, penetrating oil, and a pry bar for bushing inspection.
- Lift and support vehicle, remove wheel.
- Loosen but do not remove control arm mounting bolts.
- Separate ball joint from steering knuckle using separator or pickle fork.
- Remove mounting bolts and extract arm.
- Install new arm in reverse order, hand-tightening bolts first.
- Torque bolts to spec with vehicle at ride height.
- Reinstall wheel and lower vehicle.
Warning: Do not use a pickle fork on a ball joint you intend to reuse — it will damage the boot. Use a separator if the ball joint is serviceable and will be reinstalled. Support the knuckle with a jack or wire to avoid stressing the brake line.
Step 5: Torque Specs, Tightening Sequence, and Post-Replacement Re-Torque
Torque specs vary by vehicle — always consult the factory service manual for your specific make and model. Do not rely on generic values. For example, a 2010 Honda Civic front lower control arm-to-frame bolt is typically in the 40–50 ft-lb range, while the ball joint nut is often around 30–40 ft-lb; these are illustrative only and must be verified against the FSM for your exact year, model, and trim. Many manufacturers publish torque tables in the service manual or in online databases such as ALLDATA or Mitchell 1.
Tightening sequence: tighten the ball joint nut first (if applicable), then the control arm-to-frame bolts, then the control arm-to-knuckle bolts. Final torque must be applied with the suspension at ride height to prevent bushing twist.
Post-replacement re-torque: after 50–100 miles of driving, re-check all control arm bolts for proper torque. Many manufacturers recommend this interval, though it varies by make and model; check your FSM for the specific recommendation. This is cheap insurance against loosening from settling and vibration.
Break-in guidance: drive gently for the first few hundred miles, avoiding hard cornering or heavy braking, to allow bushings to settle.
Step 6: Alignment After Replacement Is Non-Negotiable
Replacing a control arm changes the suspension geometry — even if you mark and count threads, the new arm's tolerances will differ slightly from the old one. An alignment is mandatory.
Post-replacement symptom differentiation
| Symptom | Likely cause | Action |
|---------|--------------|--------|
| Uneven tire wear (cupping or feathering), pulling to one side, off-center steering wheel | Bad alignment | Schedule alignment; verify shop uses OEM specs |
| Clunking, wandering, vibration present before replacement and persisting after | Bad arm or installation error | Re-inspect new arm for proper installation and torque; check other suspension components (tie rods, struts, wheel bearings) |
| New clunk or noise after replacement | Improper torque, damaged boot, or misaligned component | Re-check torque, inspect boot, verify installation |
If symptoms persist after replacement and alignment, re-inspect the new arm for proper installation and torque, and check other suspension components (tie rods, struts, wheel bearings).
Loaded Assembly vs. Bare Arm: Installation Differences, Pros, Cons, and Quality Inspection
Loaded assembly pros: faster installation (no pressing bushings or ball joints), fewer tools required, less chance of installation error.
Loaded assembly cons: higher upfront cost, may include lower-quality components than OEM.
Bare arm pros: lower upfront cost, allows reuse of quality OEM ball joint and bushings if still serviceable.
Bare arm cons: requires a press for bushings, more labor, potential for installation damage.
Quality inspection for aftermarket arms:
- Ball joint boot material — look for neoprene or high-quality rubber; avoid brittle or thin boots that crack prematurely.
- Bushing durometer — rubber bushings should be firm but not rock-hard; polyurethane bushings should be within the manufacturer's specified durometer range (often 80–95 Shore A for performance applications).
- Weld penetration — inspect welds at the arm-to-bushing housing and ball joint housing; they should be continuous, with no undercut or porosity.
- Corrosion protection — check for uniform paint, e-coat, or zinc plating; bare metal or thin spots are red flags.
- Ball joint movement — should be smooth without play or binding; any looseness indicates a defective unit.
Installation differences: loaded assemblies bolt on directly; bare arms require pressing bushings and installing a ball joint, which demands a press and careful alignment of components.
Cost Breakdown and Final Decision
Cost factors: part cost (bare arm vs. loaded assembly), tool rental or purchase (ball joint press, torque wrench), alignment cost, and labor if outsourced.
DIY vs. shop decision: if you lack a press or the confidence to press bushings, a loaded assembly plus a shop alignment may be cheaper than buying tools and risking installation error.
Final decision checklist:
- Is the arm riveted or serviceable?
- Is there significant corrosion?
- Is the failure isolated to one component?
- Do you have the tools and skill to press bushings?
- What is the cost difference between bare arm + labor vs. loaded assembly?
Reminder: mileage is never a valid reason to replace a control arm — inspection findings drive the decision.
FAQ
Can I replace just the ball joint or bushing instead of the whole control arm?
Only if the arm is serviceable (bolted ball joint, press-fit bushings), uncorroded, and the failure is isolated. If the arm is riveted or heavily corroded, a loaded assembly is the practical choice.
Do I need an alignment after replacing a control arm?
Yes. Replacing a control arm changes suspension geometry, and an alignment is mandatory, not optional.
How soon should I re-torque control arm bolts after replacement?
After 50–100 miles of driving, re-check all control arm bolts for proper torque. Many manufacturers recommend this interval, but check your FSM for the specific recommendation.
Is mileage a valid reason to replace a control arm?
No. No fixed interval exists. Inspection findings drive the decision.
How often should you replace control arms?
There is no fixed replacement interval. Inspect control arm bushings and ball joints at every oil change or at least annually, and replace only when inspection reveals wear, corrosion, or damage.
Can I drive with a failing control arm?
If the arm has separated or the ball joint has pulled out, do not drive — tow it. If there is only slight play, drive cautiously to a shop or your garage and schedule the repair promptly.
---
Related