
Control Arm Bushing Replacement: Diagnose First, Then Decide Bushing-Only vs Full Arm
Do not order parts until you have isolated the noise. Control arm bushing clunk is load-dependent: it appears on braking, acceleration, and low-speed steering input. Ball joint noise is more consistent over bumps. Tie rod noise follows steering input. Map the symptom to the driving condition before you lift the car.
Is It Really the Control Arm Bushing? A Diagnostic Sequence to Isolate the Noise
Step 1: Static pry test
With the vehicle safely lifted and the suspension loaded or unloaded per the arm design, pry the control arm near the bushing and watch for movement that exceeds the ball joint and tie rod play. If the arm shifts fore-aft or side-to-side with a dull knock, the bushing is the prime suspect. If the movement is vertical at the ball joint stud, look there first.
Step 2: Exclude the sway bar and steering rack
Disconnect or isolate the sway bar end links and re-test. A worn end link mimics a bushing clunk over expansion joints. Check inner and outer tie rod play with the wheels straight and turned. Tie rod noise follows steering input, not braking.
Step 3: Confirm visually and by touch
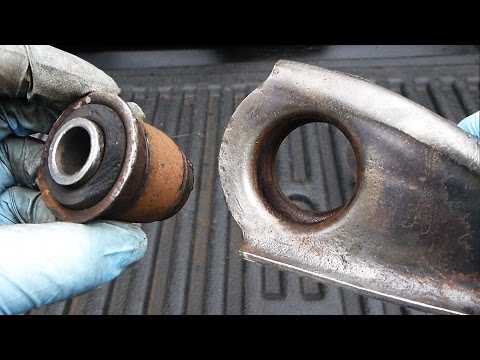
Look for cracked, collapsed, or oil-soaked rubber, separated bonded sleeves, and shiny metal-to-metal contact marks on the arm or subframe. A bushing that has separated from its outer shell will show a gap or rust trail where the rubber used to bond.
Symptoms by Driving Condition: What Worn Control Arm Bushings Actually Feel Like
Low-speed clunk over expansion joints and driveway lips is the classic bushing degradation symptom, often worse when the suspension is cold. The rubber hardens overnight and loses compliance, so the first few bumps of the day produce the loudest noise.
Braking and acceleration shimmy or clunk points to fore-aft bushing deflection. The arm shifts under torque, producing a knock that is absent during steady cruise. If the noise disappears when you maintain constant speed, the bushing is allowing movement that the ball joint and tie rod cannot.
Vague steering and wandering at highway speed can come from excessive bushing compliance changing caster and camber dynamically, but the same symptom can come from worn tie rods or a bad alignment. Do not replace bushings for a wander complaint until you have checked tie rod play and tire pressure.
Uneven or accelerated tire wear—inner-edge cupping or feathered tread—can indicate bushing deflection, but must be confirmed with a pry test because alignment and ball joints produce similar patterns. Tire wear alone is not a bushing diagnosis.
Bushing-Only vs Full Control Arm Assembly: The Decision Framework
Choose bushing-only when the arm is structurally sound, the bushing bore is not corroded or elongated, and you have access to a press or bushing driver set. This is the lowest parts-cost path and preserves the original arm geometry.
Choose a full arm assembly when the ball joint is integrated and worn, the arm is corroded or damaged, or you lack press access and do not want to risk damaging the arm with hammer or saw methods. Many late-model arms use integrated ball joints, so bushing-only service is not possible without also replacing the joint.
Vehicle use matters. Daily-driven commuter cars with sound arms favor bushing-only for cost; performance or off-road use may favor full assemblies with upgraded bushings if available. Corrosion and labor time are the hidden decision drivers: a seized bushing sleeve can turn a 1-hour bushing job into a 3-hour arm replacement, making the full assembly cheaper in total cost.
Tools and Removal Methods: Press, Hammer, Saw, and When Each Is Acceptable
A press and bushing driver set is the preferred method for clean removal and installation without heat or impact damage to the arm. Use the correct receiving cup and driver diameter so the force goes into the bushing shell, not the arm.
Hammer and drift is acceptable only with a properly supported arm and a sacrificial drift; there is high risk of bending the arm or deforming the bushing bore. If you must hammer, support the arm on a solid block and strike the bushing shell, never the arm.
The saw method—cutting the bushing sleeve out—is a last resort for seized bushings. It requires careful depth control to avoid nicking the arm bore. A nick in the bore creates a stress riser and can cause the new bushing to seat poorly.
Installation lubricant must be manufacturer-approved and rubber-safe. Petroleum-based grease can degrade rubber bushings. Polyurethane bushings often require a specific silicone-based grease; using the wrong lubricant causes squeaks and accelerated wear.
Cost and Time: DIY vs Professional Bushing Replacement
DIY bushing-only has the lowest parts cost but the highest tool investment and labor risk; press rental or purchase can offset savings. If you already own a press, bushing-only is usually the cheapest path. If you do not, factor in the cost of a press or a rental.
DIY full arm assembly has a higher parts cost but lower labor risk and no press required; it is often the better total-cost choice for corroded or integrated-ball-joint arms. You are trading parts cost for reduced risk of damaging the arm or subframe.
Professional replacement adds labor rate plus alignment. Total cost varies widely by region and vehicle, so request an itemized quote that separates parts, labor, and alignment. A quote that bundles everything into one number makes it impossible to compare shops.
Hidden costs include seized fasteners, damaged ball joint boots, and repeat alignment if the first alignment is skipped or done before the suspension settles. Budget for new fasteners and cotter pins on any car with rust.
Alignment After Replacement: Why It Is Not Optional
Bushing replacement changes the arm's effective length and pivot position, altering camber, caster, and toe. Even a small change in pivot location moves the alignment angles enough to affect tire wear and handling.
Driving without alignment risks uneven tire wear, poor handling, and premature wear of the new bushings. The new bushings will take a set in the wrong position if the alignment is off, and they will fail early.
Alignment should be performed after the suspension has settled and the vehicle is at ride height, with the new components torqued at ride height where required. Torquing at full droop preloads the bushings and changes the resting position.
Some vehicles require alignment shims or adjustable arms; confirm before booking the alignment. Not every alignment shop stocks the shims for every model, so call ahead.
Common Mistakes That Turn a Bushing Job into a Comeback
Torquing suspension fasteners at full droop instead of ride height preloads the new bushings and causes early failure and noise. This is the single most common cause of a comeback after bushing replacement.
Reusing worn or stretched fasteners, or failing to replace cotter pins and lock nuts, leads to loosening and noise. Suspension fasteners are often torque-to-yield or corroded; replace them.
Damaging the ball joint boot or tie rod boot during arm removal leads to a new noise after the job. Use a ball joint separator, not a pickle fork, on boots you intend to reuse.
Skipping the alignment or performing it before the suspension settles leaves the geometry wrong. Drive the car a few miles over varied surfaces before the alignment to let the bushings settle.
Using the wrong lubricant or installing the bushing dry causes squeaks and accelerated wear. Rubber bushings need rubber-safe lubricant; polyurethane needs silicone grease.
Parts Buying Checklist: What to Confirm Before You Order
Confirm whether the control arm has serviceable bushings or an integrated ball joint that requires full arm replacement. This is the first question to answer before you order anything.
Verify bushing material options (rubber vs polyurethane) and their trade-offs for ride and handling, but only if supported by supplied product data. Rubber bushings absorb noise and vibration for a stock ride; polyurethane bushings offer firmer handling and longer life but may increase NVH. Choose based on your driving needs.
Check for corrosion, previous damage, or aftermarket modifications that affect fitment. A corroded arm may not accept a new bushing cleanly, pushing you toward a full assembly.
Order new fasteners, cotter pins, and alignment hardware where required. For Hyundai/Kia applications, confirm the OEM number against the arm or bushing you are replacing. Examples from our catalog include the Rear Trailing Arm Bushing — 55274-2W000 and the Large suspension bushing — 54584-2D000. Always cross-check the OEM number on the part you remove.
FAQ
How do I know if my control arm bushings are bad?
A pry test with the vehicle lifted is the most reliable check. Look for excessive movement at the bushing, plus cracked or separated rubber.
Can I replace just the bushing instead of the whole control arm?
Yes, if the arm is structurally sound and the bushing bore is not corroded or elongated, and you have press access. If the ball joint is integrated and worn, replace the full arm.
Do I need an alignment after replacing control arm bushings?
Yes. Bushing replacement changes the arm's effective length and pivot position, altering camber, caster, and toe.
How long does a control arm bushing replacement take?
A bushing-only job with a press can take 1–2 hours per side; a full arm replacement can take 1–2 hours per side depending on corrosion and fastener access.
What happens if I drive with bad control arm bushings?
You risk uneven tire wear, poor handling, and accelerated wear of other suspension components.
---
Related