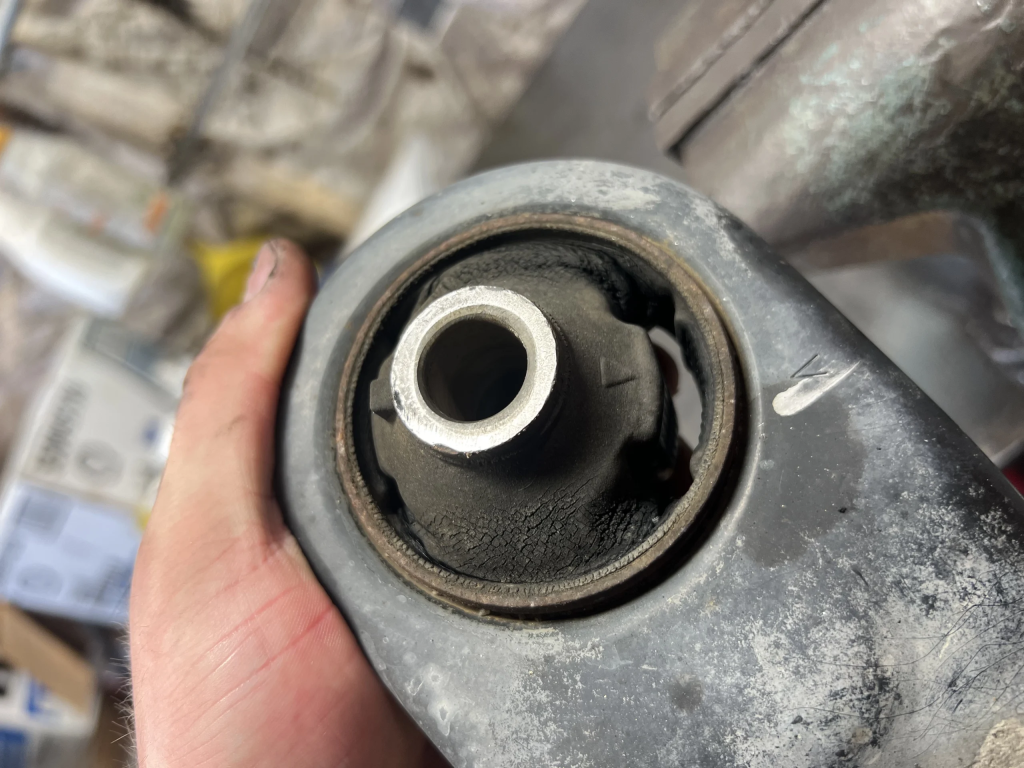
Control Arm Bushing Replacement: Press Bushings or Swap the Whole Arm?
Replace bushings alone only when the control arm and ball joint are confirmed sound and you have press access or a loan-a-tool kit. Otherwise, replace the complete control arm assembly. That is the decision rule. Mileage and noise level do not determine the answer — labor and tool access do.
This guide separates bushing symptoms from ball joint and tie rod wear, then walks through the cost math, material trade-offs, and press-free methods so you can choose the right path before spending money.
From a suspension parts manufacturer's view: the most common ordering error we see is a bushing-only order placed on an arm that also needs a ball joint or has a compromised bore. The second most common is a complete-arm order placed by a DIYer who had press access all along and did not need to spend the parts premium. Both are avoidable with a five-minute inspection and a tool-access check.
Is It Really the Control Arm Bushing? Separating Bushing, Ball Joint, and Tie Rod Symptoms
The bushing is the most commonly misdiagnosed suspension component because its symptoms overlap with ball joint and tie rod wear. The wrong part gets ordered when the diagnosis is skipped. Here is how to separate the three.
Symptom-to-component mapping
| Symptom | Most likely component | Confirming test |
|---|---|---|
| Dull, rubbery thud over speed bumps and driveway lips; vague steering with slight wander; inner-edge or cupped tire wear | Control arm bushing | Load/unload test; noise is load-dependent and muted |
| Metallic single clack over sharp bumps; loose steering at center; play under pry | Ball joint | Pry bar under the tire, load then unload — joint will pop |
| Shimmy at 50–70 mph; disconnected steering feel; play at 3 and 9 o'clock | Tie rod | Rock the tire at 3 and 9 o'clock with the vehicle raised |
| Two or more of the above present | Complete arm assembly (and inspect adjacent components) | Combined pry, shake, and road test |
The load/unload test
Bushings reveal themselves under cornering load and over irregular surfaces. Ball joints and tie rods reveal themselves under direct pry or shake tests.
- Load the suspension with a pry bar under the tire, then unload it — a ball joint will pop.
- Rock the tire at 3 and 9 o'clock — a tie rod will move.
- Drive over the same bump at the same speed — a bushing will thud.
Diagnostic flow
- Rubbery thud over bumps, load-dependent → bushing suspect.
- Metallic clack plus pry play → ball joint.
- 50–70 mph shimmy plus 3/9 o'clock play → tie rod.
- Two or more present → replace the complete arm assembly.
If the clunk is rubbery and load-dependent, the bushing is the prime suspect. If it is metallic and sharp, look at the ball joint first. If it is a shimmy at highway speed, check the tie rods.
Bushing-Only vs Complete Control Arm: The Labor-and-Tool Math
Replace bushings alone only when the arm and ball joint are confirmed sound AND you have press access or a loan-a-tool kit. Otherwise, replace the complete arm assembly. Everything else is math.
Decision matrix
| Arm / ball joint condition | Press access | Recommended path | Why |
|---|---|---|---|
| Sound arm, serviceable ball joint | Press or loan-a-tool kit available | Bushing-only | Lowest parts cost; press labor is DIY time or refundable tool deposit |
| Sound arm, serviceable ball joint | No press and cannot work the arm in place | Complete arm assembly | Bushing-only is not physically possible without press access |
| Bent, cracked, or corroded arm; or non-serviceable ball joint | Any | Complete arm assembly | A new bushing will not correct geometry or replace a staked/riveted joint |
| Any condition | Paying shop labor | Complete arm assembly (usually) | Shop press labor typically exceeds the parts premium on a bolt-on arm swap |
The math
Bushing-only saves on parts but adds press labor or DIY time. A complete arm costs more in parts but is a bolt-on job that a shop can complete faster. A shop billing by the hour will charge more to press out and press in bushings than to unbolt and bolt on a complete arm, because the complete arm is a single assembly swap. The parts cost is higher, but the labor cost is lower, and on most platforms the labor savings outweigh the parts premium.
Worked example (illustrative ranges — not quoted prices)
Actual prices vary by platform, region, and supplier. Data unavailable for a single universal figure. Use this formula with your own local numbers:
Total = Parts + (Labor hours × shop rate) + Alignment + Tool deposit (refundable)
Illustrative comparison, one side:
| Scenario | Parts | Labor hours | Labor cost | Alignment | Tool deposit | Notes |
|---|---|---|---|---|---|---|
| DIY bushing-only | Bushing set (lowest) | 2–3 hr DIY | $0 (your time) | Required | Refundable on return | Requires press or loaner kit |
| DIY complete arm | Arm assembly (higher) | 1–1.5 hr DIY | $0 (your time) | Required | None | Bolt-on; no press needed |
| Shop bushing-only | Bushing set | 2–3 hr at shop rate | Highest labor line | Required | N/A | Press labor drives the total |
| Shop complete arm | Arm assembly | 1–1.5 hr at shop rate | Lower labor line | Required | N/A | Usually the best total value |
Plug your local shop rate and parts quotes into the formula. The decision flips on the labor-hours delta and the parts delta, not on the sticker price of the bushing alone.
When the arm itself is compromised
Bushing-only is a false economy regardless of tool access if the arm is bent, corroded, cracked at the bushing bore, or has a non-serviceable ball joint.
- If the arm is bent, a new bushing will not correct the geometry.
- If the ball joint is riveted or staked and not serviceable separately, you are replacing the arm anyway.
- If the bushing bore is cracked or corroded, pressing in a new bushing will not hold.
Alignment cost
Alignment cost is identical either way, so it should not tilt the decision — but it must be budgeted in both scenarios. A four-wheel alignment is required after either path, and the cost is the same whether you replaced bushings or the whole arm.
Before you order: platform verification checklist
For Hyundai and Kia platforms, complete control arms and individual bushings are available across a wide range of chassis codes. The same model year can use different arms depending on trim and suspension package. [FACT_FROM_DATABASE]
Before ordering, verify in this order:
- Locate the VIN on the vehicle.
- Identify trim and suspension package from the VIN or door jamb label.
- Verify the control arm part number against the VIN.
- Verify the bushing part number separately — do not assume it is bundled with the arm listing.
- Confirm whether the ball joint is serviceable on that specific arm. If it is staked or riveted, plan for the complete arm.
This procedure applies to any platform where multiple arms share a model year. Do not order from a generic "fits your model" filter alone.
Rubber vs Polyurethane: Which Bushing Material Fits Your Driving?
Rubber is the correct choice for daily driving, commuting, and family vehicles. Polyurethane is the right call only when the driver accepts the NVH increase as a trade for the performance gain — typically track, autocross, or heavily modified street builds.
Rubber
Factory-style compliance. Absorbs road noise and vibration. Correct choice for daily driving, commuting, and family vehicles. Rubber bushings are designed to isolate the cabin from road input. They deflect under load, which is why they wear out, but that deflection is also what keeps the ride quiet.
Polyurethane
Reduced deflection under load. Sharper steering response and more consistent alignment under cornering. Transmits more road noise, harshness, and vibration into the cabin. Polyurethane does not deflect as much, so the suspension geometry stays more consistent under cornering load. The trade-off is that the same stiffness that improves steering feel also transmits more noise and vibration into the cabin.
Bushing material does not change the bushing-vs-arm decision — it only changes which bushing you buy if you go bushing-only. If you have decided to replace bushings only, rubber is the default for a street car. Polyurethane is a deliberate choice for a driver who wants the performance gain and accepts the NVH penalty.
Doing It Yourself Without a Hydraulic Press: Loan-a-Tool and Press-Free Methods
Loan-a-tool programs at major auto parts retailers offer ball joint and bushing press kits on a deposit-and-return basis. Confirm availability before committing to bushing-only. The deposit is refundable when the tool is returned, so the net cost is near zero if you return it on time.
Press-free alternatives
Threaded rod and cup kits, and in some cases burning out the old rubber and cutting the shell. Each has trade-offs in time, mess, and risk to the arm bore.
- A threaded rod and cup kit pulls the bushing out and pushes the new one in using a nut and thrust bearing.
- Burning out the rubber is faster but produces smoke and requires cutting the outer shell without scoring the bore.
Safety and risk controls for press-free methods
Burning rubber produces toxic smoke. Work outdoors or with strong ventilation, wear respiratory protection, keep a fire extinguisher within reach, and do not score the arm bore when cutting the shell. A scored bore will not hold the new bushing.
Threaded rod kits can gall or strip if the threads are not lubricated. Lubricate the rod and thrust bearing before use, and confirm the cup size matches the bushing diameter — an undersized cup will cock the bushing and damage the bore.
Arm removal
The arm must be removed from the vehicle for most press work. On some platforms the arm can be worked in place with a loaner kit, but access varies by chassis. On many front lower control arms, the arm must come out to get the bushing into a press. On some rear trailing arms, there is enough clearance to work in place with a loaner kit.
If no press access is available and the arm cannot be safely worked in place, the complete arm becomes the practical DIY path — this is the tool-access branch of the decision rule. If you cannot borrow a press and cannot work the arm in place, the complete arm is the only realistic option.
Step-by-Step Replacement: Bushing-Only and Complete-Arm Paths
Bushing-only path
- Raise and support the vehicle.
- Remove the arm.
- Press or thread out the old bushing.
- Press in the new one.
- Reinstall the arm.
- Torque to spec with the suspension at ride height where the design requires it.
- Align.
The arm comes out, the old bushing is pressed or threaded out, the new bushing is pressed in, and the arm goes back in. Torque the pivot bolts and ball joint nut to the manufacturer's spec with the suspension at ride height where the design requires it.
Complete-arm path
- Raise and support the vehicle.
- Disconnect the ball joint and mounting bolts.
- Swap the arm.
- Reinstall.
- Torque to spec with the suspension at ride height where the design requires it.
- Align.
The complete arm comes with a new ball joint and new bushings already installed. Disconnect the ball joint from the knuckle, remove the pivot bolts, swap the arm, and torque everything to spec.
Torque specifications
Torque values vary by platform, fastener size, and suspension design. Do not use a single generic number across vehicles. Pull the spec from the factory repair manual or a reputable torque database for your specific year, model, and trim before you start.
Every fastener — ball joint nut, pivot bolts, and any through-bolts — must be tightened to the manufacturer's spec with the suspension at ride height where the design requires it, or the new bushing will be pre-loaded and fail early. This is the most commonly omitted detail. If you torque the pivot bolts with the suspension hanging, the bushing will be twisted at ride height and will tear prematurely. Set the vehicle at ride height before final torque.
Alignment is mandatory
Replacing bushings or the arm changes suspension geometry. Skipping the alignment causes uneven tire wear and off-center steering. The alignment is not optional. It is part of the job.
The Real Cost: Parts, Labor, Tool Rental, and Alignment Side by Side
Parts
Bushing-only is the lowest parts cost. Complete arm is higher per side but includes the ball joint and arm. A bushing-only job might cost a fraction of a complete arm in parts, but the complete arm includes the ball joint and the arm itself, which are wear items on many platforms.
Labor
DIY is time only. Shop labor is the swing factor that usually pushes the decision toward the complete arm because it is a faster bolt-on job. A shop will charge more to press bushings than to swap an arm. If you are paying for labor, the complete arm is usually the cheaper total.
Tool rental
Loan-a-tool programs are typically deposit-based and refundable on return — a near-zero net cost if the tool is returned on time. If you go bushing-only as a DIYer, the tool rental is not a real cost as long as you return the tool.
Alignment
A fixed, unavoidable cost in both scenarios. A four-wheel alignment is required after either path, and the cost is the same. Add it to every comparison, not treated as optional.
Bottom line
- DIY bushing-only is the cheapest if you have the time and tool access.
- DIY complete-arm is slightly more in parts but faster.
- Shop bushing-only is usually the most expensive because of the press labor.
- Shop complete-arm is usually the best value because the labor is lower.
What Happens If You Wait — and How to Verify the Job Was Done Right
Deferring replacement accelerates tire wear — especially inner-edge and cupped wear — and degrades handling and safety as geometry drifts further out of spec. A worn bushing lets the arm move, which changes camber and caster, which wears the inner edge of the tire and makes the steering vague.
A worn bushing can mask or accelerate wear on adjacent components, so waiting can turn a bushing-only job into a complete-arm job. The movement that wears the bushing also wears the ball joint and the arm bore. Waiting increases the chance that the arm itself is compromised by the time you replace it.
Post-job verification
- Re-check torque after a short drive.
- Confirm the alignment printout is within spec.
- Listen for the original clunk over the same bumps that first revealed the problem.
If the clunk persists after a correctly torqued and aligned bushing replacement, the ball joint or tie rod was likely the real culprit — return to the symptom-to-component mapping. If you replaced the bushing and the clunk is gone, the diagnosis was correct. If the clunk is still there, the bushing was not the only worn component. Go back to the load/unload test and the pry test, and check the ball joint and tie rod again.
FAQ
Can I replace just the control arm bushing without replacing the whole arm?
Yes, but only if the arm and ball joint are confirmed sound and you have press access or a loan-a-tool kit. Otherwise, replace the complete arm assembly.
Do I need a hydraulic press to replace control arm bushings?
For most press work, yes. However, loan-a-tool programs offer bushing press kits on a deposit-and-return basis. Press-free alternatives include threaded rod and cup kits, and burning out the old rubber and cutting the shell.
How do I know if my control arm bushing is bad?
A dull, rubbery clunk over speed bumps and driveway lips, vague steering with slight wander, and inner-edge or cupped tire wear point to a worn bushing — but only if the ball joint and tie rod check out clean. Use the load/unload test to confirm.
Should I use rubber or polyurethane bushings?
Rubber is the correct choice for daily driving, commuting, and family vehicles. Polyurethane is the right call only when the driver accepts the NVH increase as a trade for the performance gain — typically track, autocross, or heavily modified street builds.
Is an alignment required after replacing control arm bushings or the complete arm?
Yes. Replacing bushings or the arm changes suspension geometry. Skipping the alignment causes uneven tire wear and off-center steering. A four-wheel alignment is required after either path.
What happens if I delay control arm bushing replacement?
Deferring replacement accelerates tire wear — especially inner-edge and cupped wear — and degrades handling and safety as geometry drifts further out of spec. Waiting can turn a bushing-only job into a complete-arm job.
Can I torque the control arm bolts with the suspension hanging?
No. If the design requires ride-height torque, tightening the pivot bolts with the suspension hanging pre-loads the new bushing. It will be twisted at ride height and tear prematurely. Set the vehicle at ride height before final torque, and pull the spec from the factory manual or a reputable torque database for your specific platform.
How do I confirm the right control arm part number before ordering?
Locate the VIN, identify the trim and suspension package, then verify the arm part number against the VIN. Verify the bushing part number separately, and confirm whether the ball joint is serviceable on that specific arm. Do not rely on a generic "fits your model" filter alone — the same model year can use different arms depending on trim and suspension package.