The Definitive Ball Joint Inspection Guide: How to Measure, Diagnose, and Decide on Replacement with Confidence
A failed ball joint can cause sudden loss of steering control, turning your vehicle into an unguided missile. That's why inspection isn't optional—it's a safety-critical maintenance task. But you don't need to guess or rely on vague symptoms. A systematic three-step process—visual, movement, and measurement—will tell you exactly what you need to know.
Many DIYers rely solely on the "wiggle test," but that's a mistake. It can miss play that only appears under load, giving you a false sense of security. The correct approach involves checking the joint both unloaded and loaded, and when possible, measuring the play with a dial indicator to compare against manufacturer specs.
This guide walks you through the entire process, from the tools you'll need to the tolerances that matter. By the end, you'll be able to inspect a ball joint with confidence and decide whether it's time for replacement.
What You Need to Know Before You Start: Tools, Safety, and Preparation
Before you put your hands on the suspension, gather the right tools and take the necessary safety precautions. Working under a vehicle is inherently dangerous—don't cut corners.
Essential tools:
- Jack and jack stands (never work under a vehicle supported only by a jack)
- Wheel chocks
- Pry bar (at least 18 inches long)
- Dial indicator with magnetic base (optional but highly recommended for precise measurement)
- Safety glasses
- Gloves
- Flashlight or work light
Safety first:
- Always use jack stands rated for your vehicle's weight.
- Place the vehicle on a level, hard surface.
- Chock the wheels that remain on the ground.
- Never place any body part under the vehicle without jack stands in place.
Loaded vs. unloaded:
Some inspections require the vehicle's weight on the wheels (loaded), while others are done with the suspension hanging (unloaded). Knowing which type of ball joint you have—load-bearing or non-load-bearing—determines the correct procedure. We'll cover this in detail later.
Step-by-Step Ball Joint Inspection: Visual, Movement, and Measurement
Follow these steps in order. Each one builds on the previous, and together they give you a complete picture of the joint's condition.
Preparation and Safety
- Park on a level surface and engage the parking brake.
- Chock the rear wheels (or front if you're working on the rear).
- Loosen the lug nuts on the wheel you'll be inspecting.
- Jack up the vehicle and secure it on jack stands.
- Remove the wheel to access the suspension components.
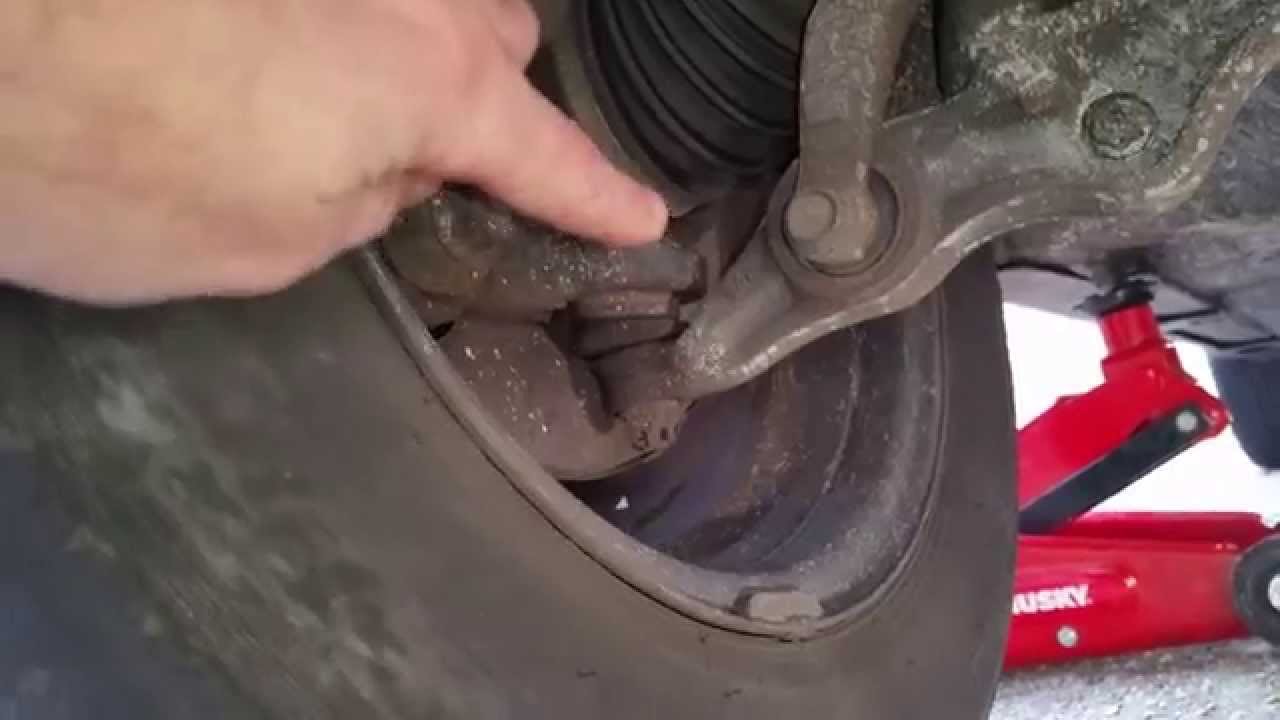
Visual Inspection
Start with a thorough visual examination. Look for:
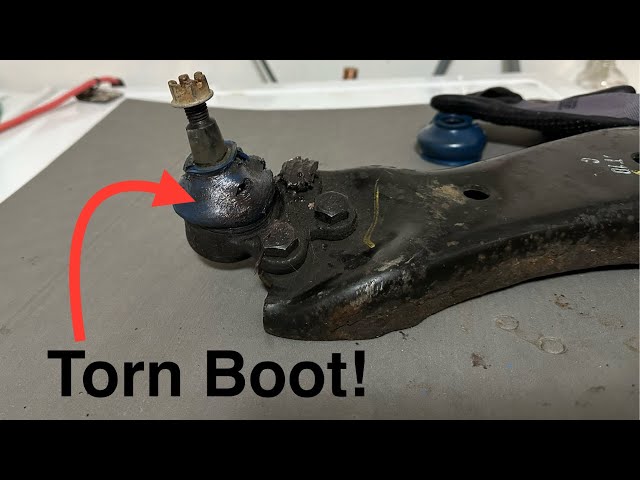
- Torn or cracked boot: The rubber boot protects the joint from dirt and moisture. A tear means contamination has already entered, accelerating wear. Even if there's no play yet, a torn boot is a ticking time bomb.
- Grease leakage: If you see grease splattered around the joint, the boot has failed and grease is escaping.
- Rust or corrosion: Surface rust on the joint body is normal, but deep pitting or flaking indicates severe wear.
- Excessive movement of the boot: If the boot looks deformed or the joint appears to shift when you move the suspension, that's a red flag.
If you find a torn boot, replacement is recommended regardless of play. Contaminated grease loses its lubricating properties, and abrasive particles will wear the joint quickly.
Checking for Play (Unloaded vs Loaded)
Unloaded Test
With the vehicle lifted and the suspension hanging:
- Grasp the wheel at the 6 and 12 o'clock positions and rock it gently. Any clunking or movement indicates vertical play.
- Use a pry bar under the tire to lift up and down, feeling for movement in the joint.
- Repeat the same test at 3 and 9 o'clock to check for horizontal play (though this is more indicative of tie rod or wheel bearing issues).
Loaded Test
Some ball joints—especially lower ones—are load-bearing. They must be checked with the vehicle's weight on them. Here's how:
- Lower the vehicle so the wheels are on the ground but still supported by jack stands (or use a drive-on ramp).
- Use a pry bar under the tire to lift up and down. You're looking for any movement or clunking in the joint.
- Alternatively, have a helper rock the steering wheel while you watch the joint for movement.
Using a Pry Bar vs Dial Indicator
The pry bar test is quick and effective for detecting gross play, but it can't tell you if the play is within spec. That's where a dial indicator comes in.
- Attach the dial indicator to a solid point (like the control arm) with the plunger resting on the ball joint stud or the wheel hub.
- Use a pry bar to apply force and read the movement on the dial.
- Compare the reading to the manufacturer's specification.
A dial indicator gives you a precise measurement in thousandths of an inch, allowing you to make an informed decision rather than guessing.
How Much Play Is Too Much? Understanding Tolerances and Manufacturer Specs
Acceptable play varies by vehicle make and model. Always consult your service manual for the exact specification. However, some general guidelines apply:
- For many passenger cars, 0.050 inches (1.27 mm) of vertical play is often considered excessive.
- Some trucks and SUVs may allow up to 0.125 inches (3.18 mm) due to their heavier suspension components.
It's important to note that any play in a ball joint is a sign of wear. The question is whether it's within the manufacturer's acceptable limit. If the play exceeds spec, replacement is necessary.
Even if the play is within spec, a torn boot or contaminated grease is reason enough to replace the joint. The boot is the joint's first line of defense—once it's compromised, the joint's lifespan is severely shortened.
Loaded vs. Unloaded Ball Joints: Why It Matters for Inspection
Not all ball joints are created equal. Some are load-bearing, meaning they support the vehicle's weight, while others are non-load-bearing and only locate the suspension.
- Load-bearing ball joints (typically lower ball joints on many vehicles) must be inspected with the vehicle's weight on them. Checking them unloaded can give a false sense of security because the play may only appear under load.
- Non-load-bearing ball joints (like upper ball joints on some vehicles) can be checked unloaded, as they don't carry the vehicle's weight.
How do you know which type you have? Consult your service manual or look at the design. Load-bearing joints are usually larger and have a more robust housing. When in doubt, check both loaded and unloaded to be safe.
Symptoms of a Bad Ball Joint vs. Other Suspension Issues: How to Tell the Difference
Ball joint failure often mimics other suspension problems. Here's how to distinguish them:
Common ball joint symptoms:
- Clunking or popping noises over bumps, especially when turning
- Excessive play in the steering wheel
- Uneven tire wear, particularly cupping or scalloping
- Wandering or pulling to one side
Differentiating from other issues:
- Tie rod ends: Noise is often felt in the steering wheel as a click or pop, and play is detected at 3 and 9 o'clock.
- Wheel bearings: Produce a humming or grinding noise that changes with speed, and may have play at 3 and 9 o'clock.
- Control arm bushings: Cause clunking over bumps but are best identified by visual inspection of the bushing condition.
A visual inspection of the boot and a movement test will usually confirm the source. If you're still unsure, a professional alignment or suspension inspection can provide a definitive answer.
When to Replace vs. Rebuild: Making the Cost-Effective Decision
Once you've determined a ball joint needs attention, you face a choice: replace just the joint or the entire control arm. Here's how to decide:
- Replaceable ball joints: Some are screw-in or press-in and can be replaced individually. This is often cheaper if the control arm is in good condition.
- Integrated ball joints: Many modern vehicles have ball joints that are part of the control arm. In this case, you must replace the entire arm.
Consider these factors:
- Bushing condition: If the control arm bushings are also worn, replacing the entire arm may be more cost-effective in labor.
- Vehicle age and mileage: On a high-mileage vehicle, replacing the complete arm can be a better investment, as it addresses all wear points at once.
- Labor costs: If you're paying a shop, the labor to press out an old joint and press in a new one may exceed the cost of a new arm.
When choosing replacement parts, high-quality aftermarket options often match OEM quality at a lower price. For example, our [Control Arm](/products/control-arm-003) for Hyundai/KIA vehicles is a direct replacement that meets or exceeds OEM specifications. Check our [automotive suspension components](/products) for more options.
How Often Should You Inspect Ball Joints? Frequency Recommendations Based on Mileage and Usage
Regular inspection is key to catching wear before it becomes a safety hazard. Here are general guidelines:
- Standard usage: Inspect ball joints during every tire rotation or oil change, roughly every 5,000–7,500 miles.
- Severe use: If you frequently drive on rough roads, off-road, or tow heavy loads, inspect more often—every 3,000–5,000 miles.
- Lifespan: Ball joints typically last 70,000–150,000 miles, but this varies widely by vehicle and driving conditions.
If you notice any symptoms—noises, steering play, or uneven tire wear—inspect immediately, regardless of mileage. Don't wait for the next scheduled service.
Quick-Reference Decision Checklist
Use this checklist to quickly assess a ball joint during inspection. If any item is flagged, replacement is recommended.
| Check | Method | Acceptable | Action |
|-------|--------|------------|--------|
| Boot condition | Visual | Intact, no cracks or tears | Replace if torn |
| Grease leakage | Visual | No grease around joint | Replace if leaking |
| Vertical play (unloaded) | Pry bar or dial indicator | Within manufacturer spec | Replace if excessive |
| Vertical play (loaded) | Pry bar or dial indicator | Within manufacturer spec | Replace if excessive |
| Horizontal play | Pry bar at 3 and 9 o'clock | Minimal or none | Replace if excessive |
| Noise during movement | Listen for clunks/pops | None | Replace if present |
FAQ
Q: Can I drive with a bad ball joint?
A: No. A failed ball joint can cause a loss of steering control, leading to a serious accident. If you suspect a problem, have it inspected and replaced immediately.
Q: How much does ball joint replacement cost?
A: The cost varies by vehicle and whether you replace just the joint or the entire control arm. Parts can range from $50 to $200 per side, and labor can add $100 to $300. DIY replacement can save on labor but requires the right tools and skills.
Q: What causes ball joints to wear out?
A: Normal wear and tear, contaminated grease from a torn boot, and harsh driving conditions all contribute. Regular inspection and maintenance can extend their life.
Q: Can I replace just one ball joint?
A: It's often recommended to replace ball joints in pairs (both sides) to maintain even handling and wear. However, if the other side is in good condition, you can replace just one.
Conclusion
Ball joint inspection is a straightforward process that can prevent a catastrophic failure. By following the visual, movement, and measurement steps outlined here, you can accurately assess the condition of your ball joints and make an informed replacement decision. Remember to always prioritize safety, use the correct tools, and consult your vehicle's service manual for specific tolerances.
If you're in need of quality replacement parts, explore our range of [automotive suspension components](/products) and [Control Arm](/products/control-arm-003) options. Our [quality control](/quality) ensures you get reliable parts that meet OEM standards.